This guide will show you how to speed up your Ghost CMS site for visitors by utilising Varnish Cache, and how to clear the cache using webhooks.
Ghost is already a pretty responsive CMS, and with the default being for it to be sat behind Nginx, you already have a lightweight and performant system (congratulations, I guess?).
However, each request that Nginx deals with has to be passed to Ghost, which must load the necessary content from disk. Even if that disk happens to be of the solid-state variety, this is a slow process.
What if we instead add a layer between Nginx and Ghost that caches static content in RAM (based on rules of our choosing), and only passes on requests for content that can't be cached? Well, we've just described a web cache, and in this case, we're looking at one called Varnish.
You install it in front of any server that speaks HTTP and configure it to cache the contents. Varnish Cache is really, really fast. It typically speeds up delivery with a factor of 300 - 1000x, depending on your architecture.
-- varnish-cache.org
Install Varnish
Installation is very straightforward:
sudo apt-get update
sudo apt-get install varnish -y
Once installed, we can optionally check/edit the service file: nano /lib/systemd/system/varnish.service
[Unit]
Description=Varnish Cache, a high-performance HTTP accelerator
Documentation=https://www.varnish-cache.org/docs/ man:varnishd

[Service]
Type=simple

# Maximum number of open files (for ulimit -n)
LimitNOFILE=131072

# Locked shared memory - should suffice to lock the shared memory log
# (varnishd -l argument)
# Default log size is 80MB vsl + 1M vsm + header -> 82MB
# unit is bytes
LimitMEMLOCK=85983232
ExecStart=/usr/sbin/varnishd \
          -j unix,user=vcache \
          -F \
          -a :6081 \
          -T localhost:6082 \
          -f /etc/varnish/default.vcl \
          -S /etc/varnish/secret \
          -s malloc,256m
ExecReload=/usr/share/varnish/varnishreload
ProtectSystem=full
ProtectHome=true
PrivateTmp=true
PrivateDevices=true

[Install]
WantedBy=multi-user.targetIf you do want to decrease the amount of RAM that Varnish uses, change the '256' in the line -s malloc,256m to your desired amount. If you edit the varnish.service file, save it and then run sudo systemctl daemon-reload.
Point Varnish to Ghost
By default, Varnish will point to port 8080, but Ghost (if your installation is standard) runs on port 2368.
Edit the default Varnish config with sudo nano /etc/varnish/default.vcl and replace 8080 with 2368, then save the file. You should end up with a backend default block looking like:
backend default {
    .host = "127.0.0.1";
    .port = "2368";
}
Point Nginx to Varnish
Now that Varnish will handle requests for our Ghost content, we need to send all traffic that comes in to Nginx towards Varnish instead of directly to Ghost.
Edit your Ghost site config file (if you installed using the Ghost CLI installer, this will be in: /etc/nginx/sites-enabled, named something like yourdomain.you-ssl.conf. If your site doesn't use https, then you'll want to edit the file without -ssl.
In this config file, look for the line: proxy_pass http://127.0.0.1:2368; (you'll notice that the port is the one we've told Varnish to direct traffic towards). Change this port to 6081 (the default Varnish port) and save the file:
proxy_pass http://127.0.0.1:6081;Enable Varnish
Our configurations are now correct, so we just need to tell Varnish to start, and to startup automatically when the system reboots:
sudo systemctl start varnish
sudo systemctl enable varnish
Restart Nginx
The last step is to restart Nginx:
sudo systemctl restart nginxTest!
That's it! If you visit your site, it should load just like normal. The first time, while the cache is empty, it will take just as long, but when it's up and running, you should notice significant improvements in load times.
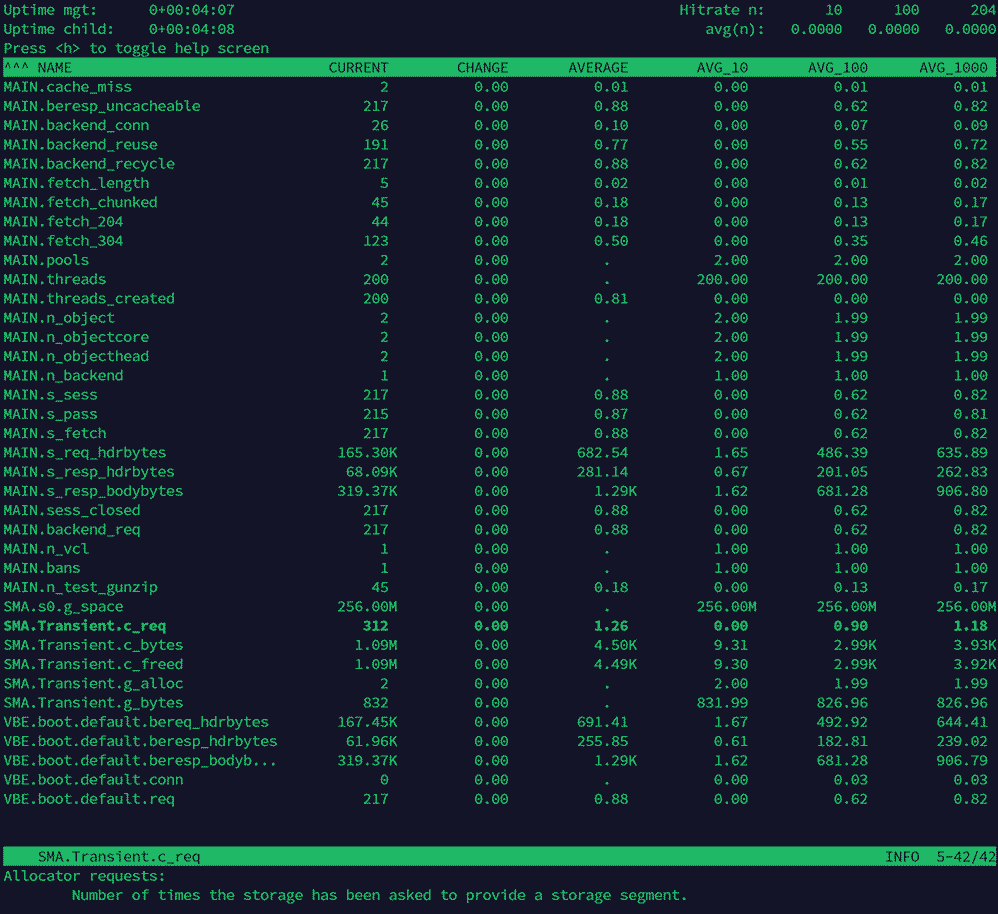
We can also use the included varnishstat (must run as root or using sudo) tool to confirm that Varnish is receiving requests:

When we refresh the page, we can see some of the counters increasing:

Tweak the config
Now that we have Varnish working in-line, we can begin to modify the configuration to tell Varnish what we want it to cache, and what to ignore.
Depending on your site, what you can cache will vary (if you have member logins enabled, you don't want to cache Alice's user information that would then get served to Bob, for example). By default, requests with cookies won't be cached.
Going back to /etc/varnish/default.vcl, let's look at the other sections (the config file itself does a good job of explaining what each section does, so I'm just pasting that in too):
sub vcl_recv- "Happens before we check if we have this in cache already."vcl_backend_response- "Happens after we have read the response headers from the backend."sub vcl_deliver- "Happens when we have all the pieces we need, and are about to send the response to the client."
vcl_recv
If you don't have any member content or comments, you could use something like:
sub vcl_recv {
  if (req.url ~ "/ghost") { # this prevents the admin section from being cached
    return (pass);
  } else {
    return (hash);
  }
}
If you do have user logins, you could limit caching to certain assets/directories (the below example assumes you have theme content in /assets, plus images uploaded through the Ghost editor in /content/images):
sub vcl_recv {
  if (req.url ~ "/assets" || req.url ~ "/content/images") {
    return (hash);
  } else {
    return (pass);
  }
}
vcl_backend_reponse
Now that we have directed the requests to our desired location, we can modify the response headers.
As an example following on from the directory-based approach above, we can specifically override any defaults that Nginx might set (for example, if the web-server sets the max cache age to zero, we can fix that here):
sub vcl_backend_response {
  if (bereq.url ~ "/assets" || bereq.url ~ "/content/images") {
    set beresp.http.cache-control = "public, max-age=259200";
    set beresp.ttl = 3d;
    return (deliver);
  }
}
Restart & test
After fiddling with the Varnish cache, restart with sudo systemctl restart varnish and test that the site works as expected (test from a user perspective too, if necessary, to ensure users don't have login/logout issues).
We can also check using curl using the command curl -v fullURLtoyourfile 2>&1 | grep "age:" on a file or image that should be within a cached location (in the example below: /content/images):
# curl -v https://yourdomain.you/content/images/file.jpg 2>&1 | grep "age:"
< age: 268
# systemctl restart varnish
# curl -v https://yourdomain.you/content/images/file.jpg 2>&1 | grep "age:"
< age: 0
Restarting Varnish purges the cache - notice the file age before and after. All seems to be working! What next?
Automatically purge the cache
The last thing we need to be able to do is to clear the cache when we make a change (you don't want readers stuck with an old version of the page, or old images/CSS/JS files).
The way Varnish documents doing this is using a BAN method instead of GET. As an example, adding the below at the top of your /etc/varnish/default.vcl file would allow for purging from only the specific addresses in the ACL (access control list). In this case, only the server itself:
acl purge {
    "127.0.0.1";
}

sub vcl_recv {
  if (req.method == "BAN") {

    if (!client.ip ~ purge) {
      return(synth(403, "Not allowed."));
    }
    if (std.ban("req.http.host == " + req.http.host + " && req.url == " + req.url)) {
      return(synth(200, "Ban added"));
    } else {
      return(synth(400, std.ban_error()));
    }
  }
}Instead of the above, we can achieve the same with a webhook:
Create the webhook
If Ghost ever provides more options for integration webhooks, this might be the best method, but instead of this, we'll look for requests to a dummy URL from addresses in the ACL (anything else will get a 403 response):
acl purge {
  "127.0.0.1";
}

if (req.url ~ "/rebuild/purge") {

  if (!client.ip ~ purge) {
    return(synth(403, "Not allowed."));
  }
  ban("req.http.host == yourdomain.you");
  return(synth(200, "Cache cleared"));
}Once you've added this section to the file and restarted Varnish (sudo systemctl restart varnish), we can test in a similar way to before:
# curl -v https://yourdomain.you/content/images/file.jpg 2>&1 | grep "age:"
< age: 10

# curl http://127.0.0.1:6081/rebuild/purge
<!DOCTYPE html>
<html>
  <head>
    <title>200 Cache cleared</title>
  </head>
  <body>
    <h1>Error 200 Cache cleared</h1>
    <p>Cache cleared</p>
    <h3>Guru Meditation:</h3>
    <p>XID: 9</p>
    <hr>
    <p>Varnish cache server</p>
  </body>
</html>

# curl -v https://yourdomain.you/content/images/file.jpg 2>&1 | grep "age:"
< age: 0
Notice that we see the 'cache cleared' response that we set in the file, and the age of our file has returned to 0. Success!
If you've not been following along, here's the final version of our default.vcl file:
# The final version of our test default.vcl file

# Marker to tell the VCL compiler that this VCL has been written with the
# 4.0 or 4.1 syntax.
vcl 4.1;

acl purge {
  "127.0.0.1";
}

# first vcl_recv block handles the cache purging
sub vcl_recv {
  if (req.url ~ "/rebuild/purge") {
    if (client.ip !~ purge) {
      return (synth(405, "Method Not Allowed"));
    }
    ban("req.http.host == yourdomain.you");
    return(synth(200, "Cache cleared"));
  }
}

# This points to our Ghost install/port
backend default {
    .host = "127.0.0.1";
    .port = "2368";
}

# second vcl_recv block handles the actual caching
sub vcl_recv {
  if (req.url ~ "/assets" || req.url ~ "/content/images") {
    return (hash);
  } else {
    return (pass);
  }
}

sub vcl_backend_response {
  if (bereq.url ~ "/assets" || bereq.url ~ "/content/images") {
    set beresp.http.cache-control = "public, max-age=259200";
    set beresp.ttl = 3d;
    return (deliver);
  }
}

sub vcl_deliver {
  # nothing here
}
Make Ghost trigger the webhook
The last piece of the puzzle is to get Ghost to trigger this URL (or 'webhook') when we post or edit something.
Login to the Ghost admin portal and go to Settings. Click on Integrations (under 'Advanced').

Now choose 'Add custom integration'.

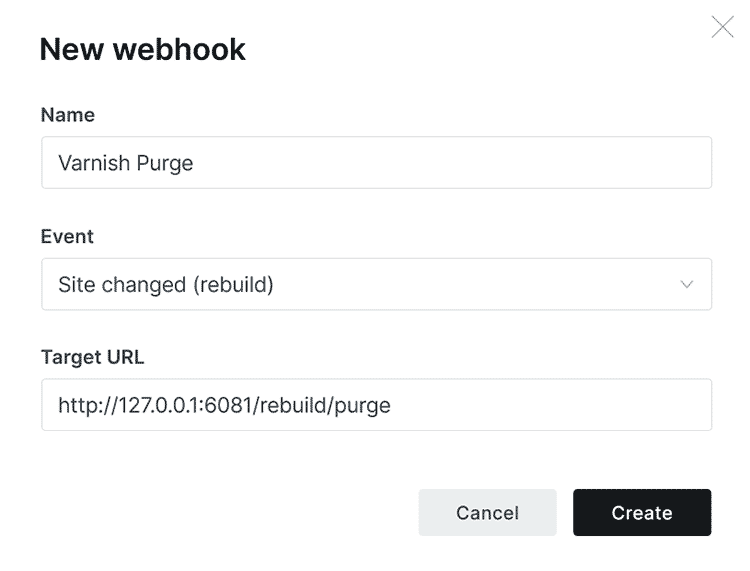
Give it a name (i.e. Varnish Purge), and on the next page, optionally give it a description. Ignore the keys and click on 'Add webhook'.

You could theoretically create multiple webhooks for purging different parts of the site, but we're going to stick with one. We'll name it the same as the custom integration, set the event to be the global 'Site changed (rebuild)' option, and set the URL (the same as the one we were testing with - http://127.0.0.1:6081/rebuild/purge).

Now we can test to see if a) Ghost triggers the webhook when we want it to, and b) that it clears the cache as we'd planned.
Edit or create a post, and once you've saved it, go back into the integrations list, and into our 'Varnish Purge' custom integration. We can see that it has worked based on the fact it has been triggered.

Now run the same CURL test to see if the file age also reverted:
# curl -v https://yourdomain.you/content/images/file.jpg 2>&1 | grep "age:"
< age: 2558

# curl -v https://yourdomain.you/content/images/file.jpg 2>&1 | grep "age:"
< age: 0
Success! Varnish is now caching the bits of the site we've told it to, and Ghost is controlling when that cache is purged!
Summary
We've added a caching layer between Nginx and Ghost, and we've given Ghost the ability to purge that cache when the site changes. The Varnish rules we've set up are very simple but should handle a lot of static content.
I'm very unfamiliar with Varnish and the best way to configure it in different scenarios, so I'd love to hear from you if you have a better way of doing it! Equally, if I've made any mistakes, let me know. I can also be found at @techbitsio.
