Speed up the your Ghost website loading time, as well as increasing your SEO by loading static content from a separate domain or sub-domain.
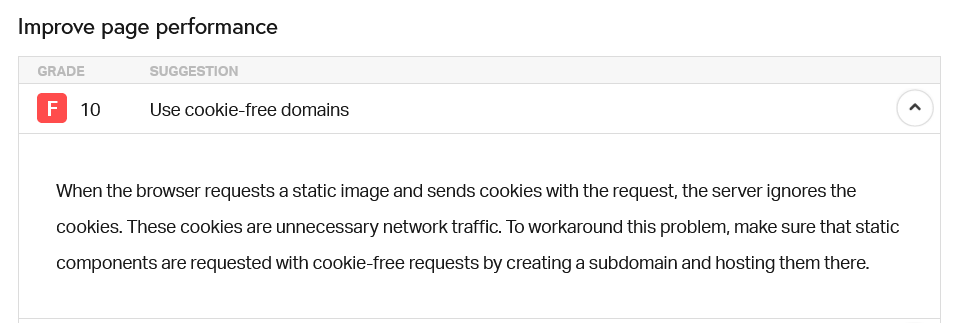
If you've tried to optimise your Ghost site's load speed, you've probably used a tool like Pingdom or WebPageTest. One of the recommendations you might find from Pingdom—particularly when using Ghost—is the suggestion that you use cookie-free domains to serve static content. This benefits your visitors by making things snappier, but could improve your SEO as page speed plays a part there too!
CDN
Using a CDN (Content Delivery Network) isn't a new concept, but if you have no mechanism to automatically send and retrieve content, this will require a lot of manual work. Another option is to use a caching provider (like Cloudflare) where you can set page rules for what you want them to cache, and therefore serve, from their CDN.
For other sites/CMSs, there might be an obvious way to integrate a CDN but with Ghost, there's no override for the image/CSS/javascript file serving location. While the cache approach would work, the cost might put some people off.
There is a way around this, though, which requires no maintenance, and doesn't require any changes in the way you upload images or theme files to Ghost.
Create a Pseudo-CDN
The way around this is to point a different domain, or a sub-domain* to the same web server (using a CNAME), and setting this up as a new site in NGINX. Then we allow requests to that URL for specific files, and redirect requests that don't match back to the main domain.
www.yourdomain.you, a subdomain of static.yourdomain.you would work. If you use the base url of yourdomain.you, request cookies will still be sent because the sub-domain is 'down' from the base url. In this case, using an external domain is the best option: e.g. yourstatic.filesFinally, we create some Nginx sub_filter rules to replace the references to static content (images, CSS files, Javascript files) with the full path to the same file on our new domain.
The beauty here is that because the new domain points to the same Ghost server, we know if the content was available before hand, it'll be available using the new path, but because the user's browser sees it as an external resource, it's sent as a 'cookie-free' request.
Note: Everything below assumes your Ghost setup is fairly standard (i.e. default paths, acme.sh SSL process etc.)
Step 1: Point your domain/sub-domain
Login to wherever you manage DNS for your new domain (or the sub-domain you're going to use, if you're going that way). All instructions below will assume a separate domain, but are equally valid for a sub-domain.
Create a CNAME for your domain, and point it to the full URL of your Ghost installation.

Add this and give it a bit of time to propagate.
Step 2: Add a new site
We need to create a folder structure to the site, partly because we want to test the DNS is working, but also to allow for the Letsencrypt challenge to function.
If you're not using https, you might be able to skip this (and don't enter the path when we create the Nginx config later), but I'd really recommend enabling https.
The commands I'm using below are using variables to make it easier, so first of all in the terminal set the username of your Ghost user, and the domain (without http(s)).
username=ghost-username
domain=yourstatic.files
Now use the following commands to create the directory structure, set permissions and create a test html page. If you're logged in as the ghost user instead of root, prepend the marked commands with sudo:
mkdir -p /var/www/$domain/html                        #sudo
chown -R $username:$username /var/www/$domain/html    #sudo
chmod -R 755 /var/www/$domain
touch /var/www/$domain/html/index.html
echo "<html>Success</html>" >> /var/www/$domain/html/index.html
Now we want to create an Nginx file for the non-https site.
ssl version below, as that's where the rules are.# Create and edit the file with:
nano /etc/nginx/sites-available/$domain #sudo
# Then paste the content below, replacing the 2 'yourstatic.files' URLs:
server {
listen 80;
listen [::]:80;
server_name yourstatic.files;
root /var/www/yourstatic.files/html;
index index.html index.htm index.nginx-debian.html;
}Save and exit (ctrl + X, 'Y', Enter).
Now we link this file to the enabled sites:
cd /etc/nginx/sites-enabled
ln -s ../sites-available/$domain .
Now test that Nginx is happy with the file with nginx -t (with sudo if necessary) and wait for the all-clear:
ghost-user@testserv1:~$ sudo nginx -t
nginx: the configuration file /etc/nginx/nginx.conf syntax is ok
nginx: configuration file /etc/nginx/nginx.conf test is successful
If that's all good, restart Nginx with systemctl restart nginx (as sudo if required).
It's worth checking here that your domain is working by visiting the non-https version and looking for the 'Success' message we set.
Visit http://yourstatic.files:80 (adding the :80 just to make sure). This can be a bit fiddly if there's something in the backend that tries to redirect to https. This could be a DNS setting (e.g. Cloudflare has an option to push all traffic to https), or a server setup thing if you visited the URL before setting up the nginx config file. Clear the browser cache and try again, if so.
Step 3: Create a certificate with Letsencrypt
Now that port 80 (http) is working, the Letsencrypt acme challenge should be able to verify the server and issue our certificates.
To do this, we're going to use the acme.sh setup that Ghost uses by default. This means that we don't have to install any other programs, and it will also get handled by the certificate renewal cron-job already created by Ghost. Convenient!
We'll set a couple of variables again (you may already have $domain set, but it doesn't matter). The email is required for Letsencrypt.
Note: See the --test on the end of the command. I'd recommend trying with this first, as this will get a certificate from the Letsencrypt staging environment. Why does this matter? Letsencrypt will only issue a certain number of certificates per domain, per week. If you have issues and have to try again a few times, you could easily burn through them. The staging environment is much more forgiving.
acme script as sudo can cause issues. If you're not logged in as root, run sudo su to change to the root user first. See: https://github.com/acmesh-official/acme.sh/wiki/sudodomain=yourstatic.files
email=your@ema.il
# First run against staging environment
/etc/letsencrypt/acme.sh --issue --home /etc/letsencrypt --server letsencrypt --domain $domain --webroot /var/www/$domain/html/ --accountemail $email --test
# If that was successful, run it again without --test, but with --force (to overwrite the un-expired once we just received).
/etc/letsencrypt/acme.sh --issue --home /etc/letsencrypt --server letsencrypt --domain $domain --webroot /var/www/$domain/html/ --accountemail $email --forceYou'll see output along the lines of:
[...] Using CA: https://acme-v02.api.letsencrypt.org/directory
[...] Single domain='yourstatic.files'
[...] Getting domain auth token for each domain
[...] Getting webroot for domain='yourstatic.files'
[...] yourstatic.files is already verified, skip http-01.
[...] Verify finished, start to sign.
[...] Lets finalize the order.
[...] Le_OrderFinalize='https://acme-v02.api.letsencrypt.org/acme/finalize/<'
[...] Downloading cert.
[...] Le_LinkCert='https://acme-v02.api.letsencrypt.org/acme/cert/<certid>'
[...] Cert success.
Step 4: Create the HTTPS site config
We'll create the config file in the same way as before, using nano /etc/nginx/sites-available/$domain-ssl but this time adding -ssl onto the end (this is to match the Ghost naming scheme, even though it's not SSL... but I digress...)
# Create and edit the file with:
nano /etc/nginx/sites-available/$domain-ssl    #sudo

# Then paste the content below, replacing the 5 'yourstatic.files' URLs:

server {
    listen 443 ssl http2;
    listen [::]:443 ssl http2;

    server_name yourstatic.files;
    root /var/www/yourstatic.files/html; # Used for acme.sh SSL verification (https://acme.sh)

    ssl_certificate /etc/letsencrypt/yourstatic.files/fullchain.cer;
    ssl_certificate_key /etc/letsencrypt/yourstatic.files/yourstatic.files.key;
    include /etc/nginx/snippets/ssl-params.conf;

    location / { if ($request_filename ~ "\.(css|js|jpg|jpeg|gif|ico|png|bmp|pict|csv|doc|pdf|pls|ppt|tif|tiff|eps|ejs|swf|midi|mid|ttf|eot|woff|otf|svg|svgz|webp|docx|xlsx|xls|pptx|ps|class|jar|woff2|less|scss)(\?v=[a-f0-9]*)*$") {
    add_header Pragma "public"; add_header Cache-Control "public, must-revalidate, proxy-revalidate"; add_header Access-Control-Allow-Origin *; access_log off; expires 1M; break;
             }
        return 302 https://yourdomain.you$request_uri;
        proxy_set_header X-Forwarded-For $proxy_add_x_forwarded_for;
        proxy_set_header X-Forwarded-Proto $scheme;
        proxy_set_header X-Real-IP $remote_addr;
        proxy_set_header Host $http_host;
        proxy_pass http://127.0.0.1:2368;

    }

    client_max_body_size 1g;
}
There's a lot going on here...
- The first bit is standard for port 443 (https), and is based on the default Ghost-created config
- There's a bit in there to allow for certificate verification
- There are pointers to the certificates. Because we used the same acme.sh script as Ghost, the paths to these are correct - you don't need to do anything with them.
- The
if ($request_filenamesection says that if a requested file has a matching filename from the list (i.e. it's a static file), we allow that request through to Ghost (proxy_pass http://127.0.0.1:2368), otherwise we redirect the user to the equivalent path on the main site withreturn 302 https://yourdomain.you$request_uri;. This means someone visitingyourstatic.files/great-articlewould be sent toyourdomain.you/great-articlewhile still allowing static images/files to be served fromyourstatic.files. RoseHosting really helped me to work this bit out. - The last bit
(?v=[a-f0-9])allows for some variables after the filename that Ghost seems to append, without which it won't match them.
Phew. Save as before, and then enable the file:
cd /etc/nginx/sites-enabled
ln -s ../sites-available/$domain-ssl .
Once again, test the config with nginx -t, and restart Nginx (systemctl restart nginx) if we passed the test.
Now test by finding an image URL on your site, and changing the domain to the yourstatic.files version. If all has gone to plan, it should load and not redirect. You can also check that the aforemention page redirect works as planned.
Step 5: Setup rules to change URLs in the page on the fly
The last step is changing the path to the files we specify, to tell the browser to load them from the new location, rather than the main site.
This will depend slightly on your Ghost theme, and to make it easier, you may want to move some files around depending on how separate they already are.
Theme files will be located in assets, but within that, it's up to the theme designer. The theme I use has subdirectories for 'icons', 'css', 'js'. I had some issues with SVG icon files loading from the new domain, so to avoid creating a rule that caught those up with .png icons, I moved all .pngs to a new 'images' subdirectory.
Aside from the files in assets, the default Ghost image location (for post images) is in content/images.
We're going to create folder based rules for all of these. Some look like duplicates, but have slightly different purposes depending on the string we're matching.
In the Nginx config file for your main Ghost site (not the one we just created). The path should be something like: /etc/nginx/sites-enabled/yourdomain.you-ssl.conf. This is the format if you used the Ghost CLI to install. The one-click Digital Ocean install might have named it slightly different.
You can have a look in the sites-enabled folder to see what it might be called:
cd /etc/nginx/sites-enabled
ls
Edit this file and add the proxy-set-header and sub_filter lines after proxy_pass http://127.0.0.1:2368;
# Edit the main Ghost config file:

nano /etc/nginx/sites-enabled/yourdomain.you-ssl.conf    #sudo

# Add the following directly after "proxy_pass http://127.0.0.1:2368;":

proxy_set_header Accept-Encoding "";

sub_filter 'src=\"/content/images/'  'src="https://yourstatic.files/content/images/';
sub_filter 'https://yourdomain.you/content/images/'  'https://yourstatic.files/content/images/';
sub_filter '=\"/assets/images/'  '="https://yourstatic.files/assets/images/';
sub_filter '=\"/assets/css/'  '="https://yourstatic.files/assets/css/';
sub_filter '=\"/assets/js/'  '="https://yourstatic.files/assets/js/';
sub_filter '=\"/assets/dist/'  '="https://yourstatic.files/assets/dist/';
sub_filter 'url(/assets/images'  'url(https://yourstatic.files/assets/images';
sub_filter '=\"/public/'  '="https://yourstatic.files/public/';

sub_filter_once off;
The format of the rules are sub_filter 'search string' 'replace string. In the above list, you can see rules for assets/images, assets/css instead of a whole /assets match. This uses more rules, but as mentioned, there are some files in assets that didn't work correctly. There are also lookups for assets/images in different forms (one for CSS url() and one for anything that uses =, such as img src=).
It's also important that the match starts before the /assets or /content path, otherwise we might match part of a full url, leaving you with something like:https://youdomain.youhttps://yourstatic.files/content/...

Save the file and exit (ctrl + X, 'Y', Enter). Check Nginx (nginx -t) and restart Nginx (systemctl restart nginx).
If all has gone to plan, when you load the site, all static files should load from exactly the same location, but using your new URL!
This took a lot of trial and error (and I mean, a lot). There are bound to be better ways of doing things, or mistakes I've made. If you spot any, please let me know in the comments so I can edit the post! You can also find me @techbitsio.