Whether you're writing a review of a NAS, are trying to troubleshoot your NAS read/write speeds, or are just plain showing off, it seems that benchmarking the transfer speed of a NAS is a common enough request that multiple vendors provide methods to achieve this.
While it's not strictly (by default) a tool to measure NAS network and read/write speed, iperf3 is a very handy command line tool that can give you a good indication of your system performance, especially if you're trying to compare configurations and improve your setup.
Install iperf3
Getting started on an Asustor NAS is fairly simple. Firstly, head into App Central and search for iperf3, then hit Install. That's it. But...where is it? How do you use it?
Because it's a command line tool, you'll need to SSH into the unit to start the iperf3 in server mode.
Enable SSH
If you've not previously enabled SSH on your NAS, go into Services ->Terminal. Select the box to enable SSH, and if you don't need SFTP, uncheck that box. Then click Apply.
Connect via SSH
Now that it's enabled, you can connect to the NAS with your SSH client of choice using an administrator or equally permissioned account on your NAS.
Just run ssh youradmin@NAS_IP and hit enter.
If you're prompted with the following, type yes and hit enter:
Are you sure you want to continue connecting (yes/no/[fingerprint])?
Run iperf3 Server
Now that you're connected to the NAS, run the following:
iperf3 -s -p 5201 -4-s tells it to run in server mode. -p allows us to specify the port (it can be anything, but 5201 is common for iperf3). -4 specifies that we're using IPv4, not IPv6.
The server process will keep running until you tell it to stop with ctrl + C.
Run iperf3 Client
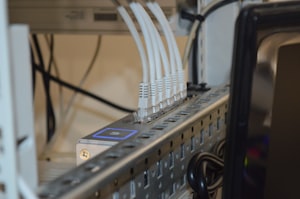
On another host on your network , i.e. where you're simulating the NAS traffic from, you'll also need to download iperf3.
You can download it for lots of different operating systems from [here](https://iperf.fr/iperf-download.php). In this example, I'm using Windows 11. After downloading and unzipping the Windows version, open a command prompt as Administrator (right-click the icon -> Run as Administrator). Either change directory to where the extracted program is (cd c:\Users\you\Downloads\whatever), or add the program to your user PATH.
Now run:
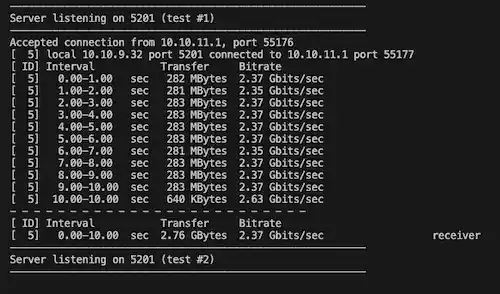
iperf3 -c NAS_IP -p 5201When you hit enter, you should see your SSH terminal to the service, and your client both start running.
Other client options
-t
If you want the test to run for longer, you can use -t to specify how many seconds the transfer should run for, where running a longer transfer might be useful if you're dealing with buffers/caches that might mask your true throughput.
e.g. iperf3 -c NAS_IP -p 5201 -t 30
-F
If you want to specify a file to transfer rather than the stream of made-up data that iperf3 will use by default, use -F c:\path\to\your\file. Bear in mind that you'll want to use a large file to get a better idea of throughput.
-R
This runs the test in reverse mode! The server will send data, and the client receives it. A nice option that means you don't have to change the command on both ends.
Other server options
-F
Just as the client has a -F option, so does the server. -F here will write the received file or datastream to the location your specify. This is where using iperf3 to check the write speed of a NAS comes into play, because you're actually forcing the machine to combine the network and disk write elements in the same process.
Depending on what volumes you have on your system, you'll want to specify the path according to the kind of test you're running (in my example, I have SSDs for volume's 1 and 2, but hard drives for volume 3).
iperf3 -s -p 5201 -4 -F /volume2/testfileEnd-to-end test
With the -F option for both client and server, we can technically test the disk read from the client, the network transfer, and the NAS's write, giving us an end-to-end test of the transfer. The downside to this comes back to the file caching, so for multiple tests, you might want to duplicate a large file.
Run multiple tests at once
iperf3 will run multiple times, although you'll need to connect a second/third/as many as you want SSH session to the NAS and run the server commands so they don't conflict with each other.
For example, note the different port numbers and filenames:
### SSH connection 1:
iperf3 -s -p 5201 -4 -F /volume2/testfile1

### SSH connection 1:
iperf3 -s -p 5202 -4 -F /volume2/testfile2

### SSH connection 1:
iperf3 -s -p 5203 -4 -F /volume2/testfile3

### Make sure each client connects to a different port!
Why would you want this? Well, some Asustor units have multiple multi-gigabit ethernet connections, and as they can run in an 'aggregated' mode, that's a lot of bandwidth that you might not be able to maximise from one PC, so using more clients let's you work out the maximum throughput your NAS can handle (even if the process will require you manually starting the session on multiple machines as quickly as possible).
Conclusion
I'm pretty new to using iperf3, but it's been very useful for generating baselines of various networking and NAS configurations. If there's anything I've missed, please let me know in the comments, or @techbits@fosstodon.org.