
While checking out an ASUSTOR NAS (the Lockerstor 6 Gen2), I tested various configurations of storage and storage types. As part of that, I set up iSCSI targets for a Proxmox cluster, to enable the use of High Availability.
The previous post covered the creation of the iSCSI Target and LUN on an ASUSTOR NAS, but the concepts are generally transferrable no matter your NAS platform, so pop over there to set your LUNs up before coming back.
This article will show the process of mounting iSCSI storage and creating a LVM (Logical Volume Manager) which is sharable across nodes on Proxmox VE 7.3 through Proxmox VE 8.1, however, the underlying components are stable and these instructions are likely to work on older/newer versions, too.
Open a Shell
Either SSH to your Proxmox node, or log in to the web interface, choose the node, and select Shell.
We're going to edit the file /etc/iscsi/iscsid.conf, so using your favourite text editor, open the file.
nano /etc/iscsi/iscsid.confn-comment the following lines (or just paste them again, at the end of the file) and edit to add the username and password you set when creating the iSCSI target.
node.session.auth.authmethod = CHAP
node.session.auth.username = testtesttest
node.session.auth.password = your_passwordSave the file, and head to the Proxmox web interface.
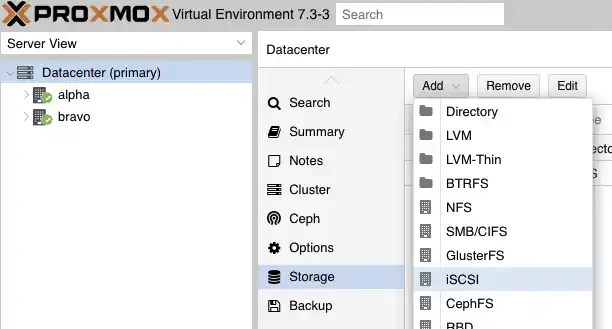
Add iSCSI
From the web interface, choose Datacenter -> Storage -> Add -> iSCSI.
You'll be prompted to add an ID (so you can identify the created iSCSI object). The Portal is the IP of the NAS/storage location, and the Target is, unsurprisingly, the iSCSI Target on that device.
You can confirm your CHAP settings are correct if you click the dropdown arrow and the IQN populates in the list.
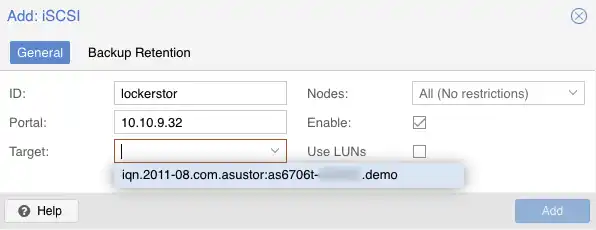
If you want the target to be available to all nodes in the Datacenter, leave Nodes as 'All', otherwise choose the nodes you want from the drop-down. Leave Enable...enabled.
Use LUNs directly is checked by default, but you'll most likely want to uncheck this. When enabled, a created VM will use the entire LUN as its storage drive, where we want to create an LVM on the large LUN.
Click Add to confirm, and your iSCSI device will now be available.
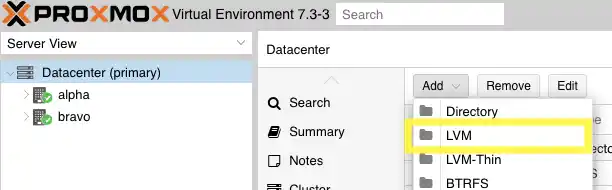
Add LVM
From the same Datacenter -> Storage page, again click Add, and this time choose LVM.
Enter an ID, and then for Base storage, click the dropdown and choose the iSCSI Target we just configured. Now under Base volume, you'll see the list of LUNs available to us. In this case, there's only one... select it.
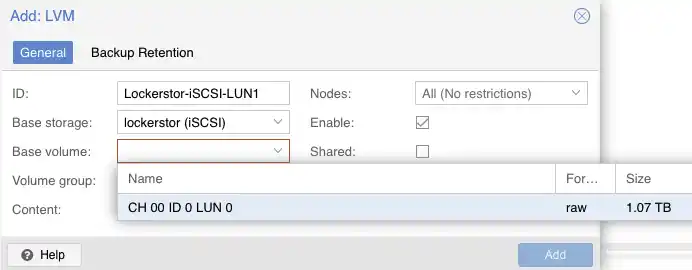
Next, name the Volume group. As we're creating one logical volume on the LUN, I've just given this the same name as the ID but appended with -VG.
For content, you can specify whether you want to allow only containers or VMs, but leave as default if you want both. Like with the previous 'Add iSCSI' pane, we select what nodes should have access to this LVM. Select what you previously chose, but leaving as All is most likely what you want. Leave Enable checked, and then check Shared if you want to allow the LVM to be treated as shared storage (i.e. used for High Availability failover).
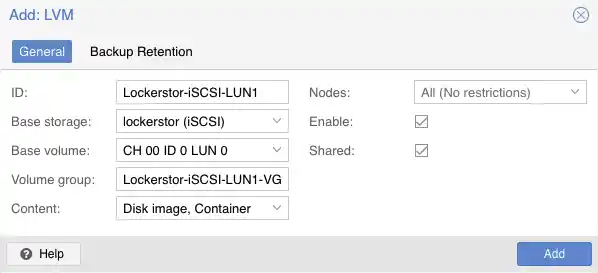
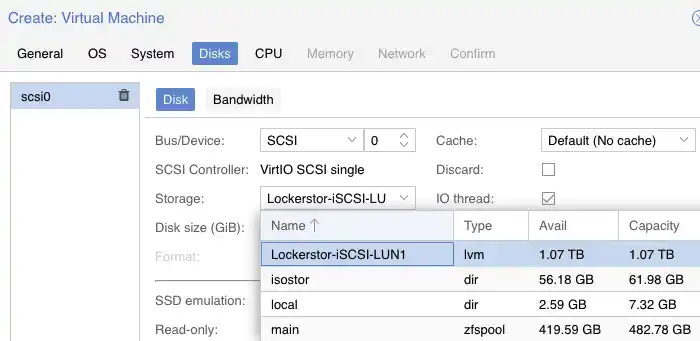
Once you're happy, click Add. Now under storage, you should see the new LVM, and if you go through to create a VM, when you get to Disks, you should see the new LVM show up!
Potential Issues
If you're adding your LUN to a cluster, you'll most likely need to reboot all but the primary node, otherwise you might see a question mark icon over the iSCSI and LVM options in the Server View, and find that these nodes are unable to connect to the target at all.
Summary
That's it! You've created an iSCSI target and LUN on your Asustor NAS, and you've configured one or more Proxmox nodes to use it as storage (or maybe shared storage) for VMs and containers!
Although this post is specific to Proxmox VE and written from the point of view of using an Asustor NAS, but Synology/QNAP systems are equally viable, or any other storage system that supports iSCSI.
If there's anything I've missed, please leave a comment or let me know at @techbits@fosstodon.org.