This post will take you through the process of setting up the SwitchBot Blind Tilt and how you can start controlling your devices from the cloud.
Following on from their successful Kickstarter campaign, SwitchBot recently got in touch asking if I wanted to test the SwitchBot Blind Tilt for the purposes of reviewing it, as well as putting a couple of 'how-to' posts together. Their interest in a Home Assistant-focused guide was particularly interesting, and it's nice to see smart-accessory makers putting effort into avenues other than their own proprietary hubs.
That said, Home Assistant isn't for everyone, so this post will go through how to install the Blind Tilt, show some examples of creating schedules and rules, and then show the Hub Mini setup process. This setup is all you'd need to be able to control things remotely using the SwitchBot app or via Alexa/Siri/Google Home/IFTTT and more.
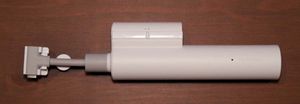
What is the Blind Tilt
The Blind Tilt is a retrofit blind controller, suitable for blinds that use a twist-style wand to adjust the open/close tilt. It's a Bluetooth device–specifically BLE 5.0 for better range & battery life, and meshing capability–and sports a 2000 mAh lithium battery with an advertised life of 10 months between charges. However if you install the included mini-solar panel, you won't need to worry about charging it. Through the iOS and Android app, there's scheduling and timer functionality, as well as some rules-creating functionality that utilises the in-built light sensor.
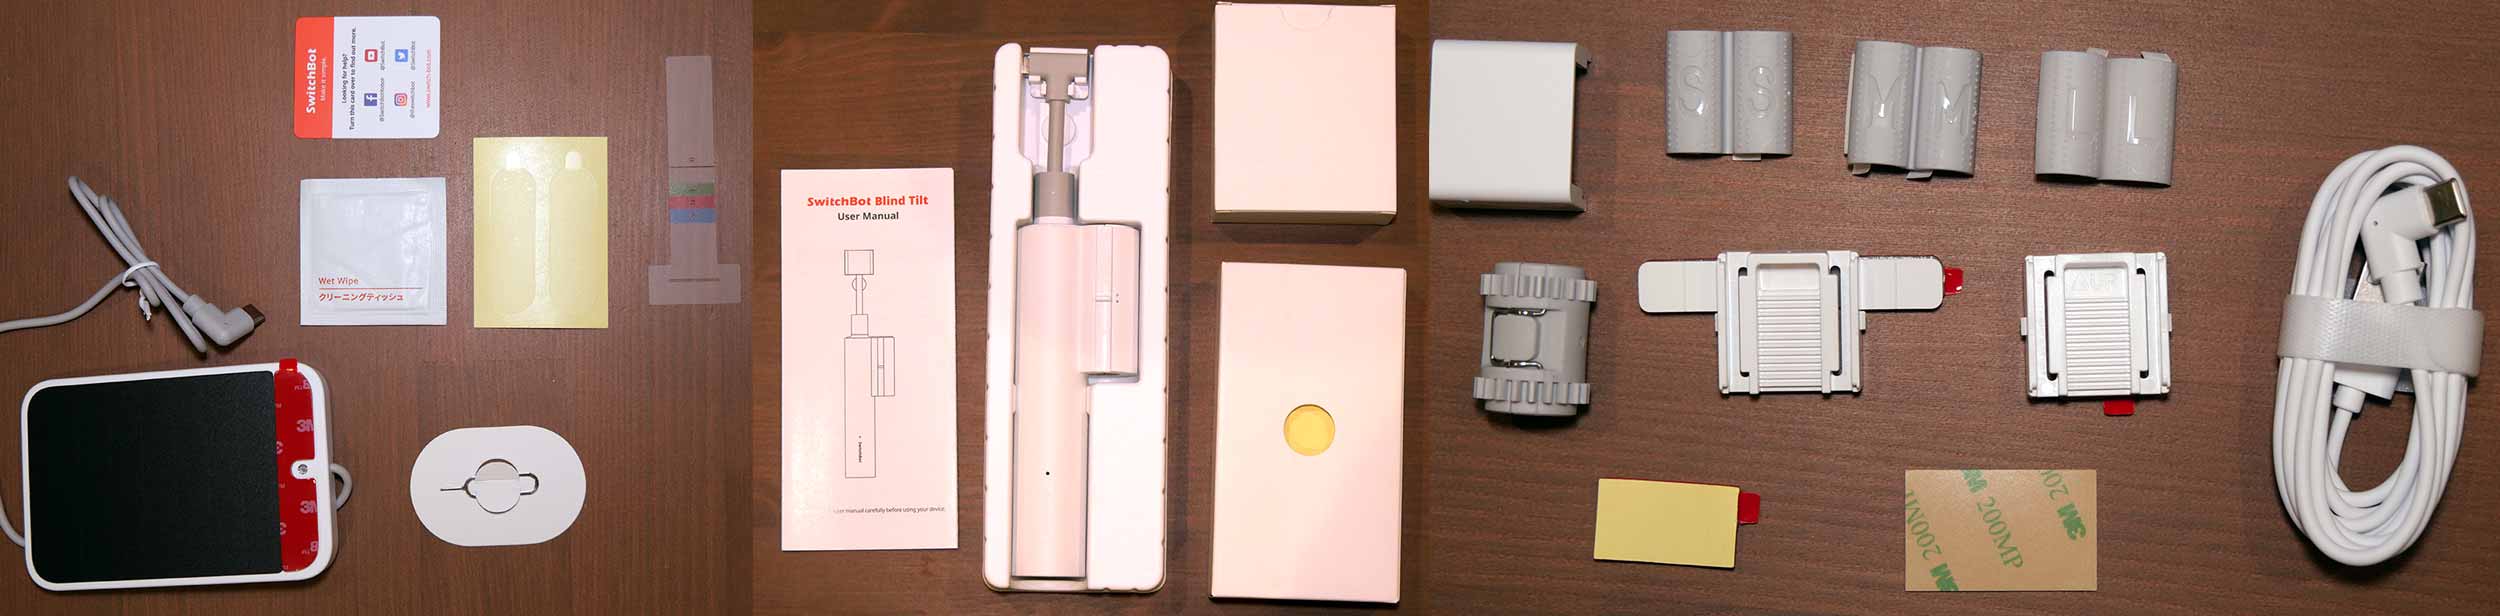
The box contains everything (and I mean everything) you'll need to install the unit and start automating your blind control.
Using the SwitchBot App
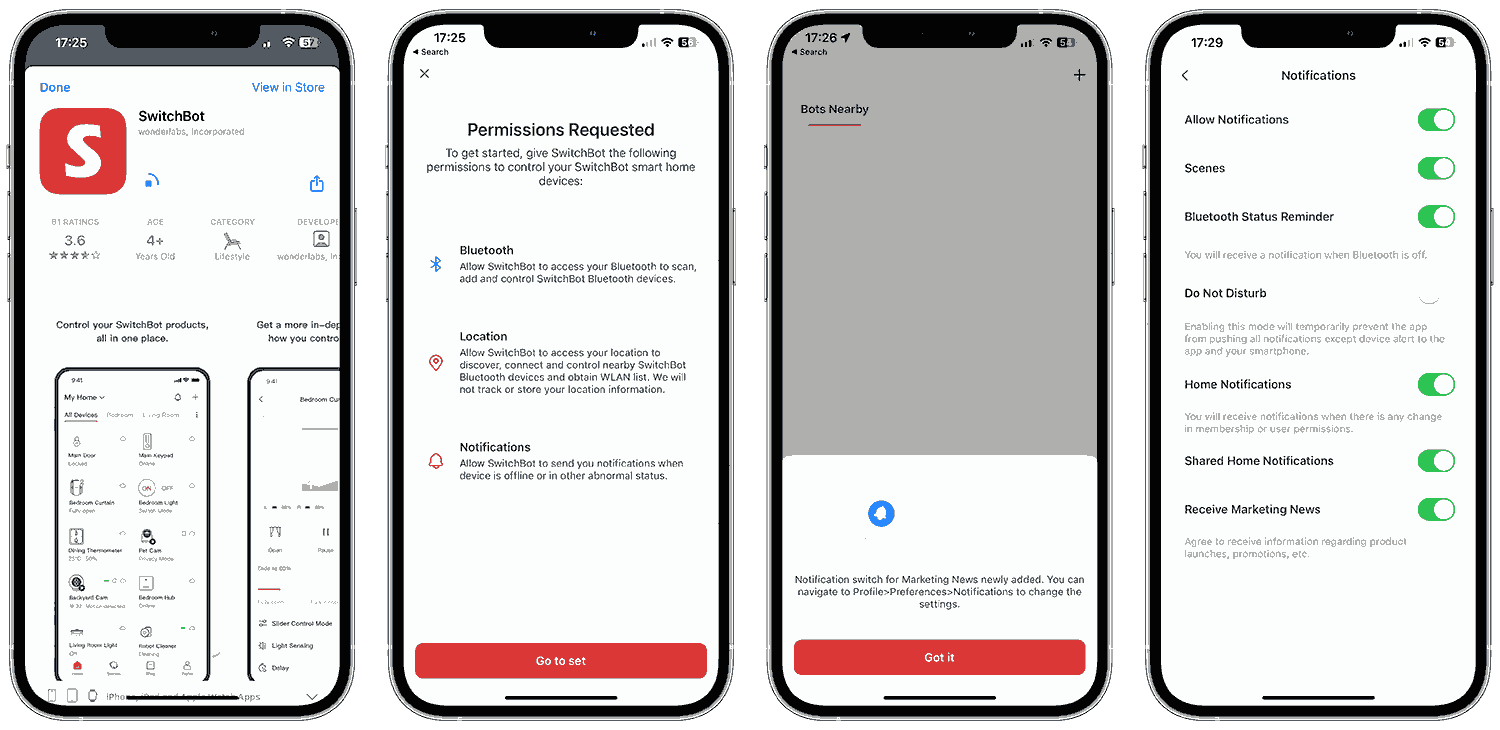
You'll need to install the iOS or Android SwitchBot app, and after accepting the required app permissions, you'll need to either sign up for a SwitchBot account, or sign in using a Google/Amazon/Apple account.
Once you have your account and you're logged in, from the main home screen, click the + icon in the top right to add your Blind Tilt.
The app will scan for nearby Bluetooth devices. If your Blind Tilt is in standby mode, it should appear once found, otherwise you'll need to select the 'Blind Tilt' option under Home Automation.
You'll be prompted to press and hold the button on the underside of the unit for 2 seconds (until the white LED on the front–next to the SwitchBot logo–flashes). Once in pairing mode click Next and the Blind Tilt will pair to your phone.
At this point, if there's a pending firmware update, you'll be prompted (or, required–there wasn't an option to skip it) to install it.
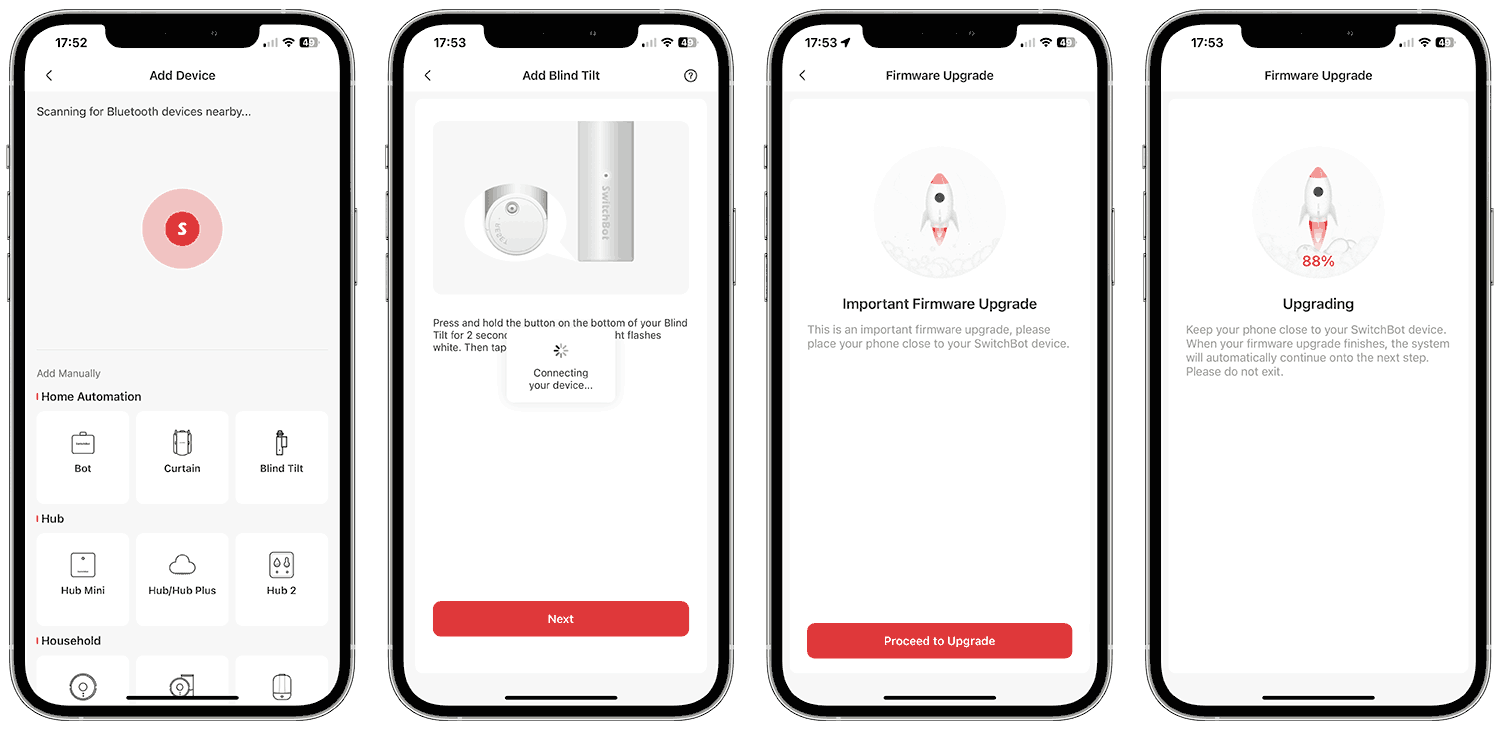
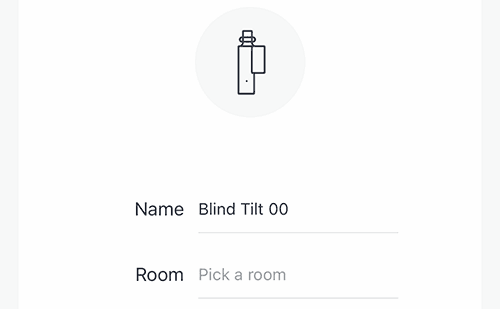
Once complete, you can name the device and add it to your desired room (although if you haven't created any rooms, you won't be able to select this yet).
This is the point where you'll need to mount the unit to your blind. The app has links to a pictorial guide (the same images as included in the manual) and a video guide.
I found the paper manual to be more useful than the on-screen version, but the video explains things a bit better than the images in the manual, so I'd recommend watching it before you start. The manual can also be downloaded here.
Mounting the Blind Tilt
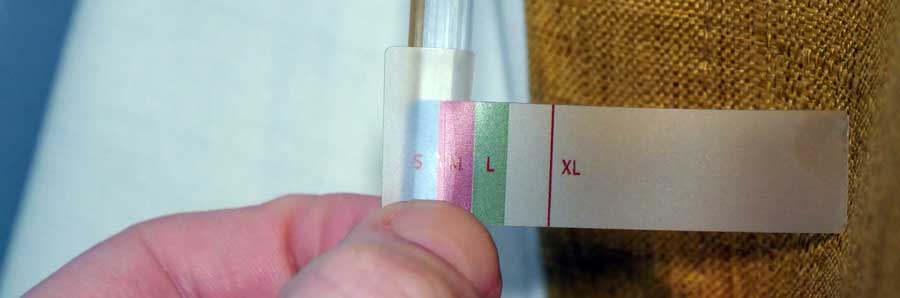
The kit includes a bit of plastic(?) that is used to roughly measure the circumference of your blind control wand. You'll use an adapter for the size bracket that it falls into.
Once you have this adapter ready, you'll use a cardboard template that comes with pre-applied double-sided sticky tape, sticking it to the underside of the headrail. Where the bottom of the template meets the wand is where you'll clamp the adapter from the previous step.
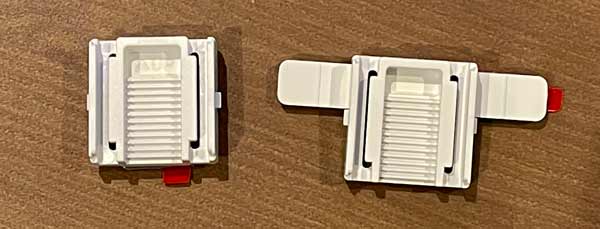
Remove the backing on the 3M sticky pads inside the adapter and squeeze it around the wand.
Leaving the cardboard template in place, you'll choose a mount for the Blind Tilt that will stick to the headrail. There are two different options: Option 2 is for if you don't have space for option 1, which would be if the pull-cord for the blind is too close to the wand. In my case, it was, so I went for option 2.
If you go for 3 or 4, you'll need to take off the white plastic mount at the top of the cable and reattach it on the front of the Blind Tilt.
Now you can remove the cardboard template and attach the coupler around the S, M, L or XL adapter you previously stuck to the wand. The teeth on this are what the Blind Tilt grabs onto to open and close the blind.
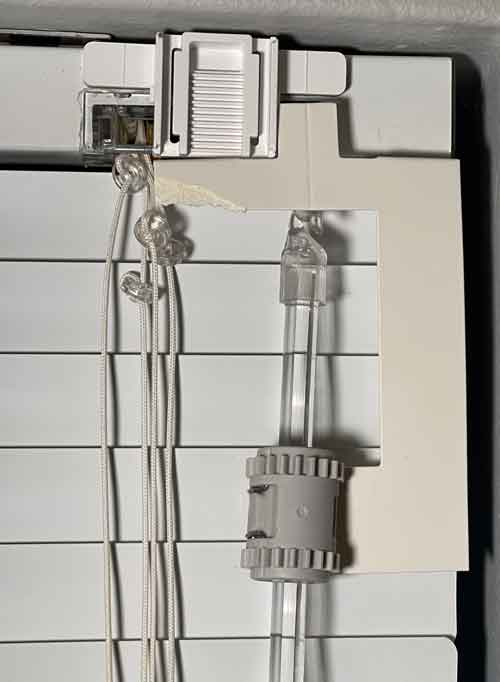
Now you can fit the actual Blind Tilt itself. Press the plastic tab on the back of the 'cord holder' (the bit with the USB-C connector at the top) and push it up into the mount stuck to the headrail. Then open the latch on the wand casing, and centre the coupler in the middle of the casing (the gear teeth should match up). Close the casing and make sure the latch clicks shut.
Now adjust the cord holder–moving it up or down slightly–so that the wand hangs vertically.
The only (optional) thing left to do is find a spot on the window to stick the included solar panel, and then as neatly as possible, route the cable back to the USB-C connector at the top of the cord.
Back to the App
Where were we? Oh yeah, the app showed us the helpful pictures and video.
Unlock your phone, hit 'Skip' on the installation guide page and you'll be prompted to calibrate the unit.
This was a bit fiddly because one of my blinds seems to slightly move back when fully closed up or down, so after being forced to try again (twice), I just made sure I didn't close it as far.
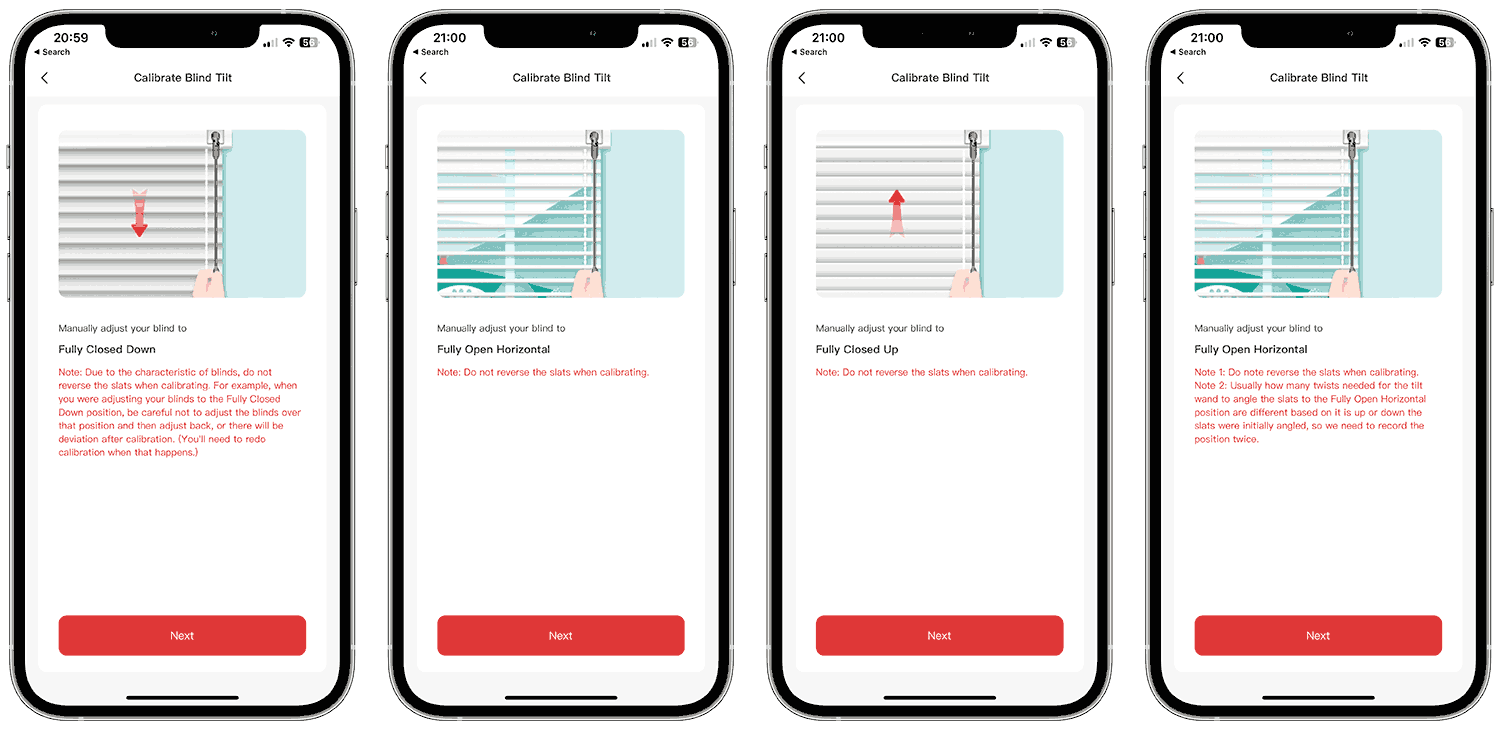
Close the blind 'down' and press Next to begin. You'll be guided to move the blind position to open horizontal, closed up, then back to horizontal. Once done, you'll be presented with a confirmation, and now you can press 'Get Started' to test it out.

When initially using the Blind Tilt, I found that the cog around the wand wasn't quite meshing properly. It sounded like it slipped, and then it tried to close too far. Luckily, it didn't break the blind (the Blind Tilt just gave up in the end). I reseated the gear coupler and recalibrated it, and it didn't happen again.
Schedules & Automation
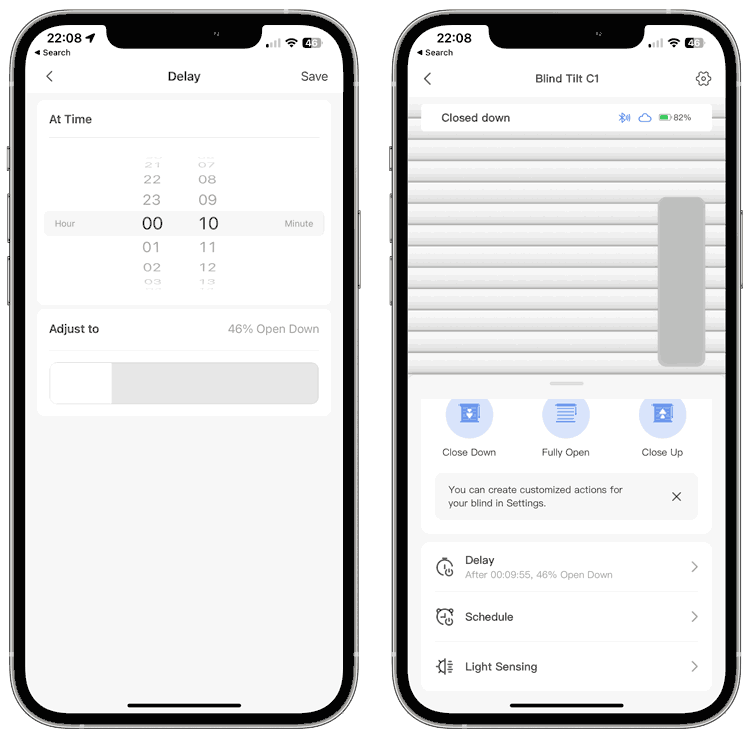
Now that you can control a blind, you can create schedules, you can set a timed delay, or you can use the built-in light sensor to create rules to automatically open and close the blind.
The rules you create are saved directly to the Blind Tilt, meaning your phone doesn't have to be near it to run the automation.
Delay
The app is a bit confusing here. It says 'At Time', but it looks like they've just reused the view from the schedule creation process. It does actually work as a delay/timer... Once you hit save, you'll see the delay starts counting down.
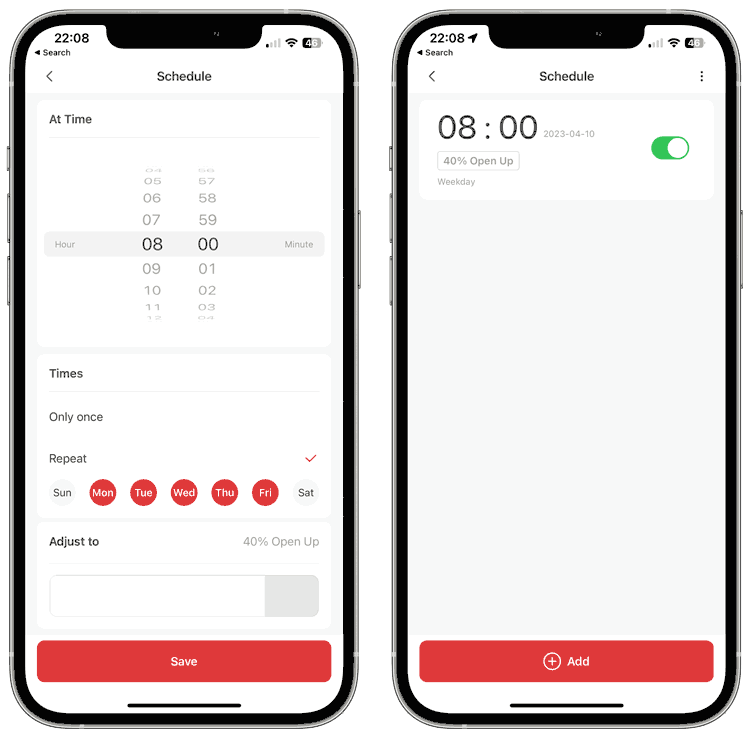
Schedules
You can set one-off or recurring schedules, and the interface for creating these is quite user-friendly. Being able to turn a schedule off and on (instead of having to delete and recreate) is a nice touch.
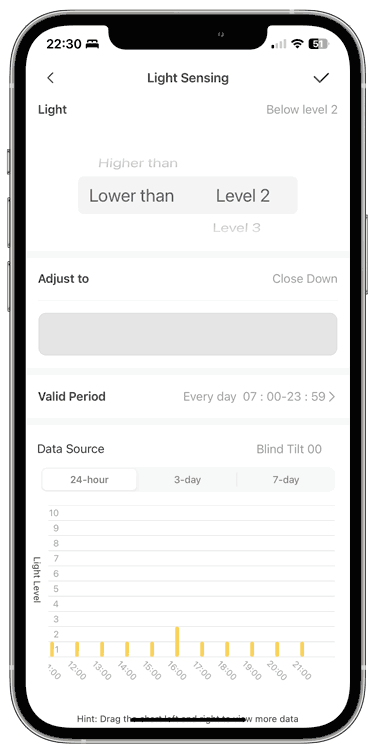
Light Sensing
This is perhaps the nicest potential feature of the Blind Tilt when you consider it as a standalone device (i.e. if you haven't connected it to a hub, or Home Assistant). Rules like 'open if the brightness level is high, but only after 10am' enable you to supplement a standard fixed open/close routine with some useful functionality.
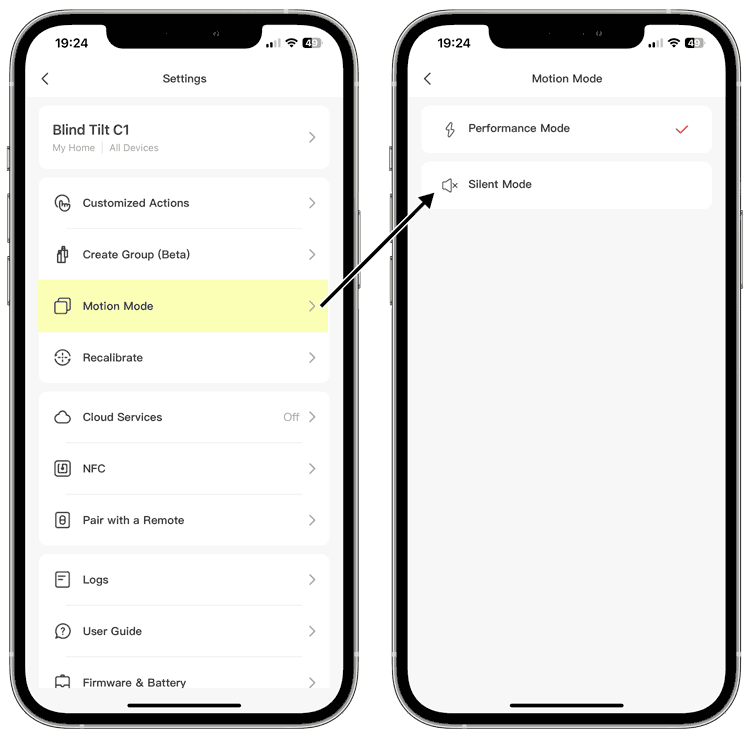
Silent Mode
One other setting I think is worth pointing out, is that you're able to change the Blind Tilt to run in Silent mode (as opposed to the default Performance mode). I wouldn't say the device is too loud, but it has a relatively small motor and sounds as you would expect. Changing to Silent mode, you'll realise it's not silent. It should definitely be labelled as Quiet mode, to avoid disappointment. It does run the motor at a slightly lower speed, however, so the sound is a bit quieter and the sound you do hear is of a lower pitch.
Adding a Hub into the Mix
To make changes to these schedules, or to manually control the blind you will need to be in close enough proximity for the Bluetooth to connect. If you want to control them from further away, or even from outside your home, you'll need to look at the hubs SwitchBot offers. I say hubs (plural) because I don't think they're designed for one to serve the whole house. Due to the range limitations of Bluetooth, you may find you need more than one. Also, because both the Hub Mini and the Hub 2 have infrared blasters, you might need one in the line of sight to devices you want to control in multiple rooms.
It'll be very interesting to see if this can be used to add SB devices to Home Assistant instead of requiring Bluetooth.
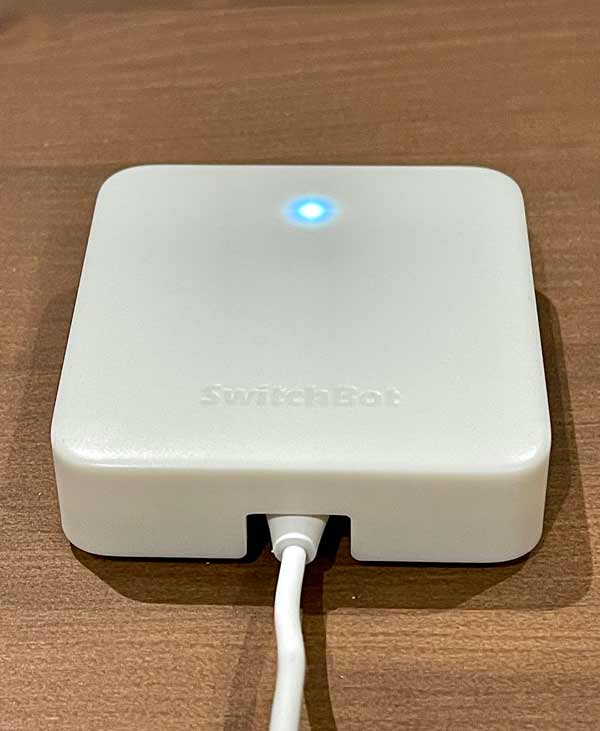
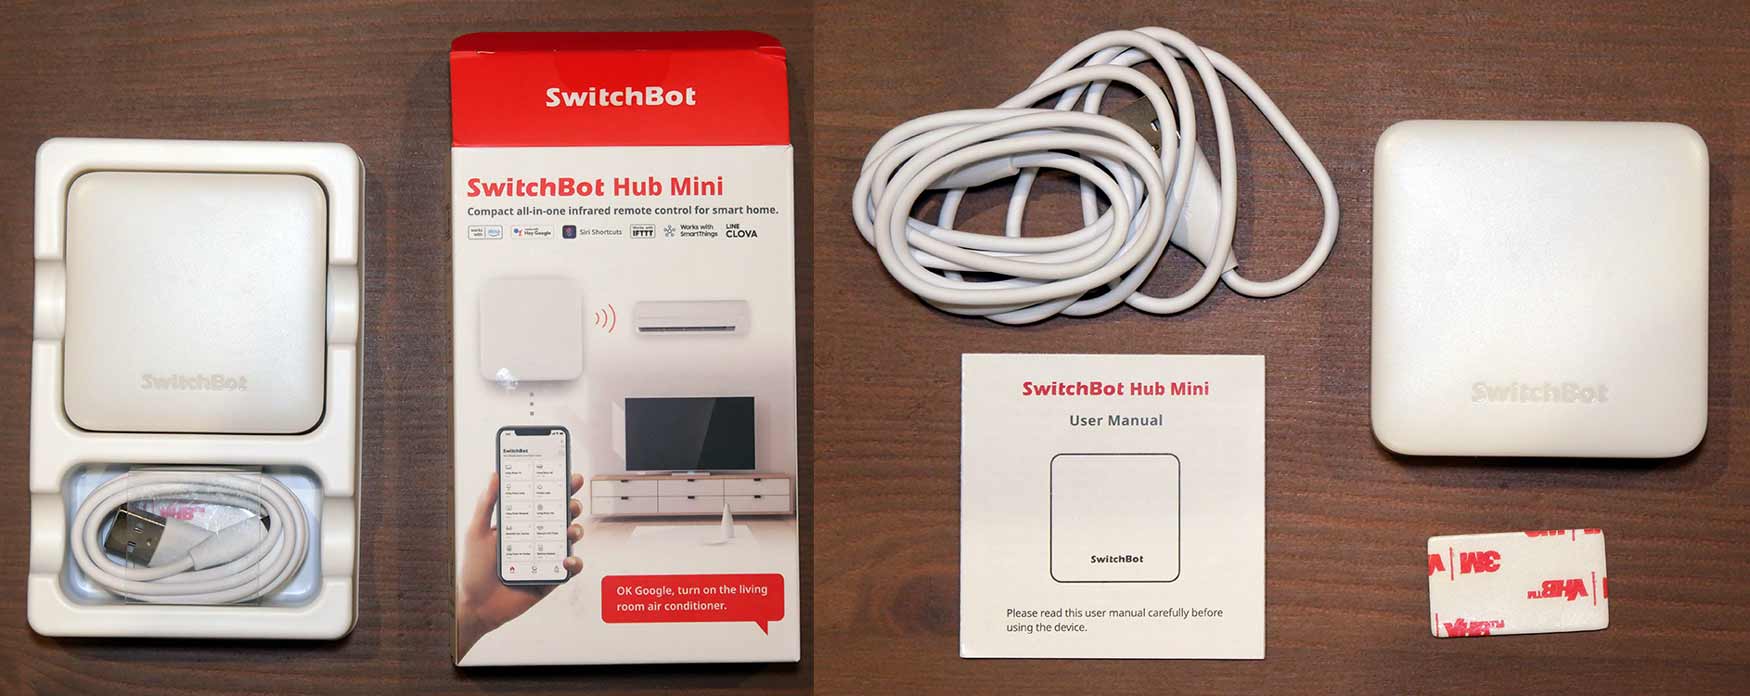
For the purposes of testing, I have a Hub Mini to add to the mix. The box contents are pretty minimal: Aside from the hub, there's a USB-A to Micro USB cable, a manual and a double-sided sticky pad to allow easy mounting of the hub (there's also a mounting key on the rear).
The pairing process is as simple as the Blind Tilt, and after connecting a micro USB power supply, the hub showed up in the discovered devices.
After selecting it, you're prompted to hold the button on the hub until the light starts flashing, at which point the app guides you to setup Wi-Fi. There's nothing revolutionary here, although it's nice to see an IoT device that supports Wi-Fi with a hidden SSID.
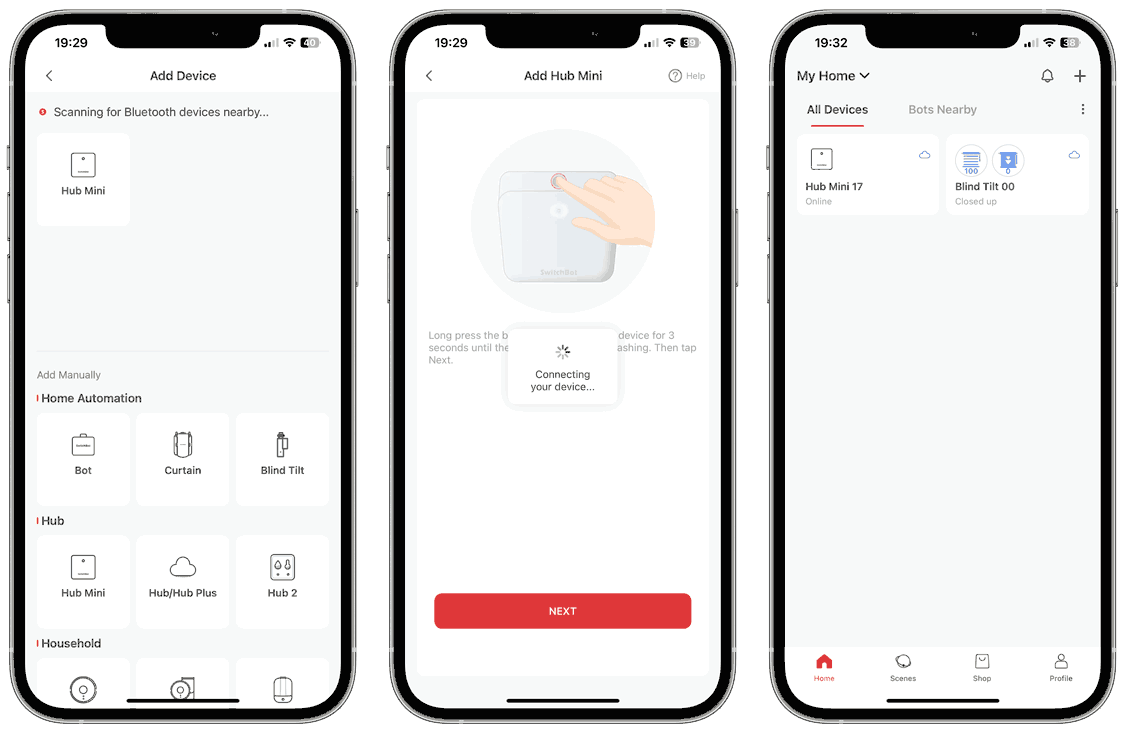
Once added, you'll be redirected to the home screen, and if you look closely, you'll notice that the hub and Blind Tilt now have a small cloud icon to the right of them. This is to show which devices can be controlled remotely.
This is somewhat confusing, however, as if you go into a device -> Settings, you'll see that Cloud Services is still switched off.
I don't understand why a setting for Cloud Services wouldn't also include their own cloud. At the very least, it should be a separate option to disable remote control. I double-checked this behaviour, and with Cloud Services turned off, Wi-Fi and Bluetooth switched off, I was still able to control the Blind Tilt. Worth bearing in mind then that the Hub Mini will always talk to SB servers.
What Next?
At this point you could add other SwitchBot devices (I'm looking to test more of the eco-system soon, including the Bot, the Meter Plus and the Remote, so be sure to check back!) or you could look to add automation using the aforementioned cloud-services.
Alternatively, you could skip the Hub Mini/Hub 2 altogether and go straight for the Home Assistant Bluetooth integration!
As this was my first foray into SwitchBot devices, there could be some things that I've missed. If that's the case, or if you found this useful, please leave a comment or send me a message at @techbits@sudo.cat or @techbitsio.

