This guide will show you how to upgrade from one version of Ubuntu to the next (20.04 to 22.04, in this example), as well as the services that will prompt for action along the way.
If you've ever used a VPS/cloud server provider such as Vultr or DigitalOcean, you'll know how quick it is to create a new server, and how much choice you have when it comes to the operating system flavour and version.
Because of this, it's often easier to deploy a new system and restore application data than it is to upgrade a system with that data in place.
It can also be reassuring to deploy a new server because any configuration errors or security issues over time will get wiped out.
Occasionally, though, you may want to upgrade a version because it's either easier to upgrade around your application than it is to move it, or because the version you want to use isn't offered by the provider you're using.
The latter happened to me when I was testing the service offered by VMHaus. I was looking for a provider to run a Mastodon instance, and while VMHaus offers a good mix of CPU cores, RAM and bandwidth, the latest version of Ubuntu they offer as a template is 20.04.
So how do you upgrade?
Run the Upgrade
The command is very simple: do-release-upgrade
-d flag to the do-release-upgrade command. This would upgrade your system to the latest development version, which at this point would be 22.10, not the LTS 22.04 version.Old systems also needed
apt-get install update-manager-core, but this is included by default on newer (20.04 included) versions.do-release-upgrade only ever tries to upgrade by one version. So running this on 18.04 would upgrade to 20.04.To confirm how your system is set up to handle release upgrades, run
cat /etc/update-manager/release-upgrades. I believe (correct me if I'm wrong) that if the system is installed as a .04 LTS release, the file will be set to Prompt=lts, meaning that only LTS versions will be installed upon upgrade (unless you force it otherwise with the -d flag).Run this as your root user, or as sudo. If there are any pending system changes, you might see the message:
You have not rebooted after updating a package which requires a reboot. Please reboot before upgrading.
root@mastodon:~# do-release-upgrade
Checking for a new Ubuntu release
You have not rebooted after updating a package which requires a reboot. Please reboot before upgrading.
root@:~# reboot
root@mastodon:~#
Session was closed
If so, do as the system says and reboot. Once the booted back up, you can run the command again. This time it should proceed:
Reading cache

Checking package manager

Continue running under SSH?

This session appears to be running under ssh. It is not recommended
to perform a upgrade over ssh currently because in case of failure it
is harder to recover.

If you continue, an additional ssh daemon will be started at port
'1022'.
Do you want to continue?

Continue [yN]
Say 'Y' to Begin
The upgrader is quite intelligent these days. If you're using SSH to connect (rather than through a KVM/sat in front of the machine) it will start a new SSH process on port 1022. If you get disconnected, you can try reconnecting to this port instead of 22. Make note of the warning about firewalls, though:
Starting additional sshd

To make recovery in case of failure easier, an additional sshd will
be started on port '1022'. If anything goes wrong with the running
ssh you can still connect to the additional one.
If you run a firewall, you may need to temporarily open this port. As
this is potentially dangerous it's not done automatically. You can
open the port with e.g.:
'iptables -I INPUT -p tcp --dport 1022 -j ACCEPT'

To continue please press [ENTER]
If you're running a firewall, add this rule so the additional SSH daemon can be reached if required. If you're upgrading a fresh Ubuntu 20.04 install to 22.04 you'll find that the firewall is off by default, so you won't need to worry about this.
It'll work out what needs to be upgraded, and prompt you for a y or n. d will give you the specifics on the packages to be upgraded. Say yes and the process will begin.
Calculating the changes

Do you want to start the upgrade?


4 packages are going to be removed. 120 new packages are going to be
installed. 671 packages are going to be upgraded.

You have to download a total of 749 M. This download will take about
2 minutes with a 40Mbit connection and about 19 minutes with a 5Mbit
connection.

Fetching and installing the upgrade can take several hours. Once the
download has finished, the process cannot be canceled.

 Continue [yN]  Details [d]
Prompts
While it's running, you'll be prompted a few times. The first will be whether you want affected services to be restarted automatically:

If you say No, you'll be prompted for each individual service restart, so I'd recommend saying Yes!
Other services will ask if you want to install the default config for the new version, or to keep the version you already have installed. Responding with D to these will show you the details of what has changed. For example:
Configuration file '/etc/systemd/journald.conf'
 ==> Modified (by you or by a script) since installation.
 ==> Package distributor has shipped an updated version.
   What would you like to do about it ?  Your options are:
    Y or I  : install the package maintainer's version
    N or O  : keep your currently-installed version
      D     : show the differences between the versions
      Z     : start a shell to examine the situation
 The default action is to keep your current version.
*** journald.conf (Y/I/N/O/D/Z) [default=N] ? D
The relevant lines from the changed config (a + prefix shows it's a new line, - prefix shows it was removed):
 [Journal]
-Storage=auto
+#Storage=auto
 #Compress=yes
 #Seal=yes
 #SplitMode=uid
@@ -41,3 +44,4 @@
 #MaxLevelWall=emerg
 #LineMax=48K
 #ReadKMsg=yes
+#Audit=no
It should be generally ok to keep existing configurations, but it's certainly worth checking each config to get a feel for what has changed (there should only be a couple, so it won't take much longer to check).
Another example:
Configuration file '/etc/systemd/timesyncd.conf'
 ==> Modified (by you or by a script) since installation.
 ==> Package distributor has shipped an updated version.
   What would you like to do about it ?  Your options are:
    Y or I  : install the package maintainer's version
    N or O  : keep your currently-installed version
      D     : show the differences between the versions
      Z     : start a shell to examine the situation
 The default action is to keep your current version.
*** timesyncd.conf (Y/I/N/O/D/Z) [default=N] ? D

... header of config file removed for brevity ...
 [Time]
-NTP=1.time.constant.com 2.time.constant.com 3.time.constant.com
+#NTP=
 #FallbackNTP=ntp.ubuntu.com
 #RootDistanceMaxSec=5
 #PollIntervalMinSec=32
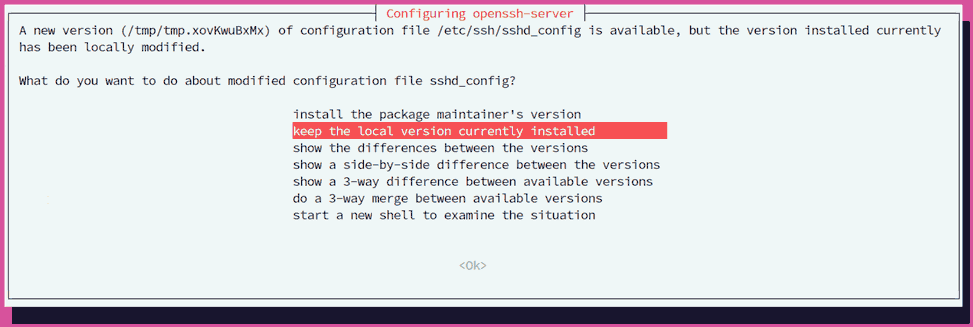
Sometimes, these prompts will be of the pseudo-graphical variety:

For the sshd_config, it's definitely worth checking the changes. Keeping the existing config is probably ok.
Remove Old Files
Once everything new has been installed, you'll be asked whether you want to remove obsolete packages. Unless there's something very specific you want to keep, say Y.
Processing snap replacements

refreshing snap lxd

Searching for obsolete software
Reading state information... Done

Remove obsolete packages?


91 packages are going to be removed.

 Continue [yN]  Details [d]
Reboot to Finish
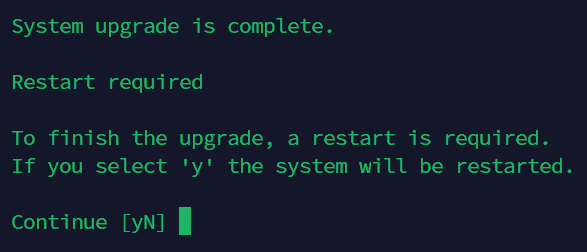
Once it's done, you'll be prompted to reboot the system. If there are any other changes you need to make, you can put it off, but make sure you do reboot.

System upgrade is complete.

Restart required

To finish the upgrade, a restart is required.
If you select 'y' the system will be restarted.

Continue [yN]
Confirm the New Version
Once the system has rebooted and you've logged back in, you should see the login/welcome banner:
Welcome to Ubuntu 22.04.1 LTS (GNU/Linux 5.15.0-52-generic x86_64)
You can also run cat /etc/lsb-release to see the system information, and you should see something like:
DISTRIB_ID=Ubuntu
DISTRIB_RELEASE=22.04
DISTRIB_CODENAME=jammy
DISTRIB_DESCRIPTION="Ubuntu 22.04.1 LTS"
The command itself is very simple, but as you can see, there are a few other things to be aware of, even if the defaults will be fine in most cases (and certainly if you're upgrading a clean LTS version to the next release).
If there's anything I've missed, or this helps you out, please leave a comment to let me know! You can also reach me at @techbitsio.
