
In my last post, I ran through the process of setting up a Backblaze B2 (S3) bucket and getting your Mastodon instance to use it to store images, and from which to serve content.

This post is a follow-up, but the process isn't exclusive to Mastodon: This guide can be followed by anyone wanting to serve B2 bucket content from their own domain/sub-domain via Cloudflare.
We'll cover each step of the process, and before you know it you'll be utilising a global CDN to cache your content from an S3 bucket, at absolutely no cost to you!
You said free?
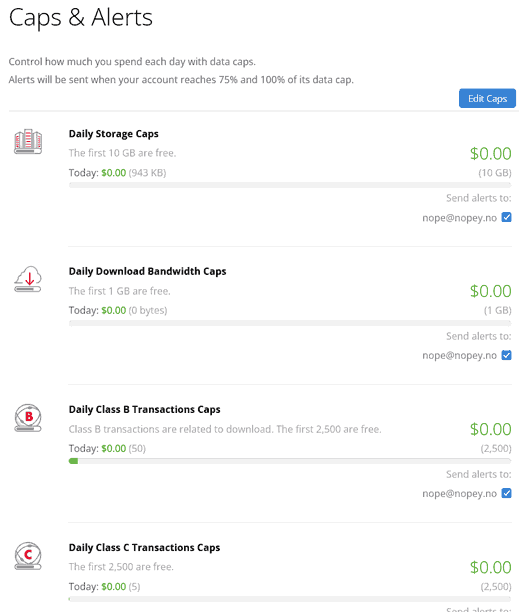
Let's take a step back. Backblaze offers S3-like storage at a fairly low price. There's some free storage and transfer allowances, but ignoring those for a moment, you pay:
- $5 per month per 1 terabyte of storage
- $0.01 per 1GB of content downloaded from your bucket (egress charge)
- $0.004 per 10,000 'class B transactions' (individual file downloads from your bucket)
- $0.004 per 1,000 'class C transactions' (API calls. For what we're looking at here, the bulk of these would be file uploads to your bucket using S3 calls)
The highest-looking charge here would appear to be the $0.01 per GB downloaded. 100GB, that's $1. However, Backblaze are a founding member of Cloudflare's 'Bandwidth Alliance', which means any Backblaze B2 content you serve via Cloudflare, is completely free!

Not only does this cut bandwidth costs, but because even free accounts can utilise Cloudflare's CDN caching, we can also drastically cut the number of those pesky 'class B transactions' while also improving the performance for your users/visitors/viewers.
On top of all of this, Backblaze has a free tier which allows 10GB of storage, and 1GB of daily egress, and 2,500 per day of both class B and class C transactions. All of this is to say, you might think you need paid storage and find you bill sits at $0 for a long time!
Prerequisites
You'll need to sign up for a Backblaze account and follow the bucket setup instructions over on my previous post: Using Backblaze B2 (S3) Storage with Mastodon. Again, while this is aimed at setting up S3 storage for Mastodon, the bucket setup, API key setup are equally relevant for any other application.
The only thing we'll do differently to the previous post is, when asked: 'Do you want to access the uploaded files from your own domain?' say yes, and enter the domain or subdomain you want to use. This could be files.example.com, or assets.example.com - it doesn't matter what you choose, it just needs to be a different domain/sub-domain to your Mastodon instance. Remember what you set, as we'll be creating a CNAME for it in the next step.
Other information we'll need from the previous process is the 'Friendly URL' from the list of URLs we got after uploading our test file to Backblaze.
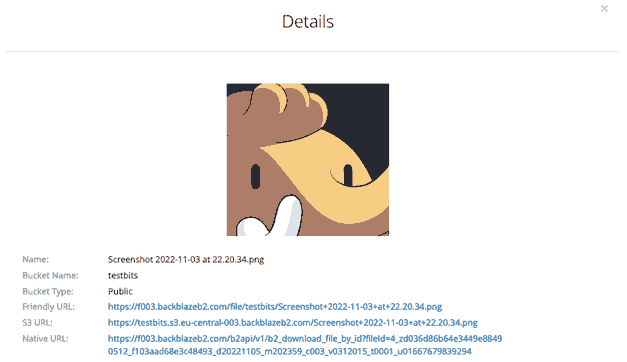
This will differ region to region, but where we previously used the S3 URL that is prefixed with our bucket name, we'll instead use the friendly URL, in this case: https://f003.backblazeb2.com/file/testbits.
Sign Up to Cloudflare
If you don't already have a Cloudflare account, you'll need to create one. Head over to dash.cloudflare.com/sign-up create and activate your account. The free plan is fine for what we're doing (and is surprisingly fully-featured).
Once you've created your account, you'll need to move the DNS for the domain you want to work with over to Cloudflare.
Cloudflare makes this very straightforward, and if that means moving a domain you already have in use (hosting your Mastodon instance, for example), the Cloudflare step-by-step process will find the existing DNS records for that domain and re-create them before you migrate, although you might want to turn off 'proxy status' if your main domain is already in use/hosting Mastodon so other changes we make don't affect it. There's a community post if you need hints along the way.
Once you've added your domain and it has fully propagated, we can finally begin.
Add a CNAME
From your Cloudflare dashboard, choose the domain you'll be using, choose DNS from the menu on the left, and click 'Add Record'. In the 'type' drop-down, choose CNAME.
At this point, if you're using a root domain (i.e. example.com) you'd enter '@' in the name field, otherwise enter the part of the subdomain you want to create. For my example, that's 'massets' (assets for Mastodon... geddit?).
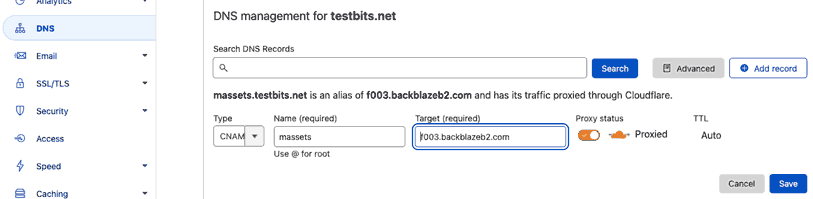
For the target, enter the friendly URL we reminded ourselves of in the Pre-reqs section above, but only the domain part, not the https:// or the /file/bucket-name bit. For this example, that's 'f003.backblazeb2.com'.
Make sure 'Proxy Status' is showing 'Proxied' (nothing else we do will work without this!), and hit 'Save'.
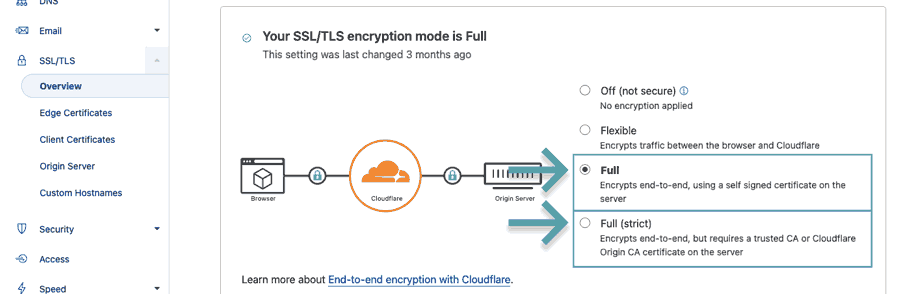
Set SSL/TLS
From the menu, select SSL/TLS and then click Overview. You'll be presented with the current SSL/TLS mode for your domain. This needs to be set to Full or Full (strict). I tested with both of the other options: images will not load.
So Far, So Good
At this point, you can test the work so far. If the friendly URL of your image was:
https://f003.backblazeb2.com/file/bucketname/testfile.pngYou should now being able to access that file on:
https://sub.example.com/file/bucketname/testfile.pngThat's a good start, but given that every single URL will contain /file/bucketname, we can remove this from our requesting URL and automatically add it to request we send to Backblaze.
URL Rewrite
To remove /file/bucketname from our 'pretty'/nicer URL, we'll use Cloudflare Transform Rules.
Still in your domain's section of your Cloudflare account, scroll down in the menu until you see Rules. Click the drop-down and choose Transform Rules.
In the right-hand pane, click the drop-down for 'URL Rewrite' - you'll see there's nothing there (if you've used this domain for something else before, and DO find something there, make sure to remove it before starting).
Just above, click 'Create transform rule', then 'Rewrite URL'.
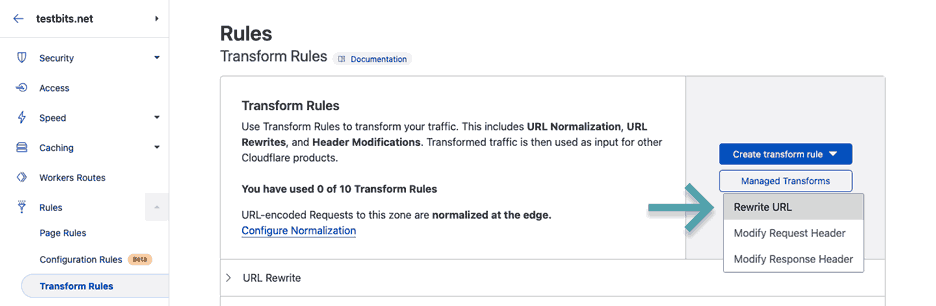
Give the new rule a name, then look to the right of the 'Expression preview' box for a link that says 'Edit expression'.
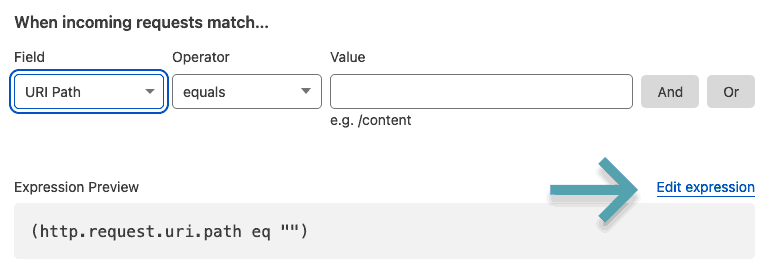
Click this and enter the line below (making sure to add your actual bucket name):
(http.host eq "sub.example.com" and not starts_with(http.request.uri.path, "/file/bucketname"))What this does checks for all requests to see if, after the domain portion, they already start with '/file/bucketname', because if they do, we don't want to add it twice.
For anything that matches this rule we want to automatically add the '/file/bucketname' part, so under the 'then...' bit of the rule choose the 'Rewrite to...' radio option and set the drop-down to 'Dynamic', and set the rule to the line:
concat("/file/bucketname",http.request.uri.path)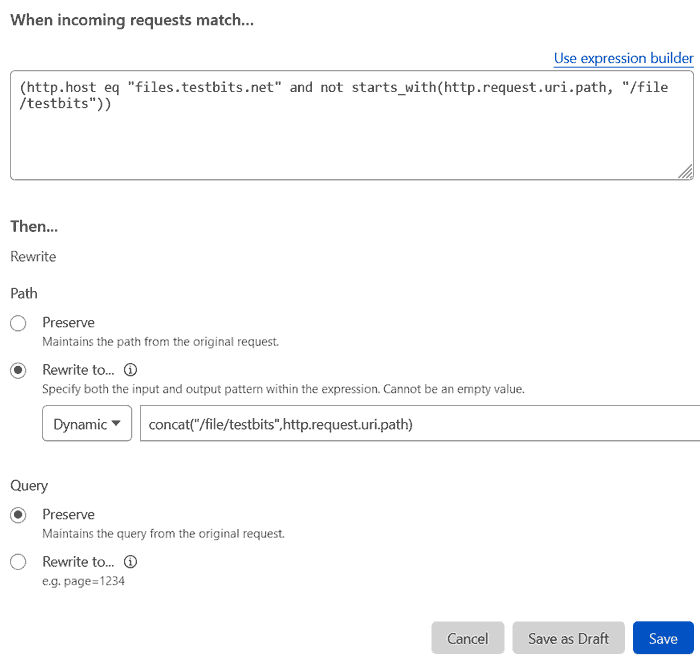
This tells the rules engine to concatenate this with the trailing part of the request. We don't ever see this, it'll just happen in the background.
Save the rule, and we can see if it works...
Does it rewrite?
Before, we tested that the image at:
https://f003.backblazeb2.com/file/bucketname/testfile.png...could be accessed at:
https://sub.example.com/file/bucketname/testfile.pngThis time, we can go one step further and try to access the image without /file/bucketname:
https://sub.example.com/testfile.pngCheck that this loads, and if it does, let's move on.
Remove Backblaze HTTP Response Headers
When a web browser loads a page or file, there's a lot of information it gets back that you don't see. For files served from Backblaze, there are 'x-bz' headers for things like the file ID, filename, the upload date, etc. We can see this through the web browser's Developer Tools menu, but as per the Backblaze article on this, using curl is a bit simpler.
You might not worry about other people seeing this information, but it's good practice to remove unnecessary information like this, but it's up to you.
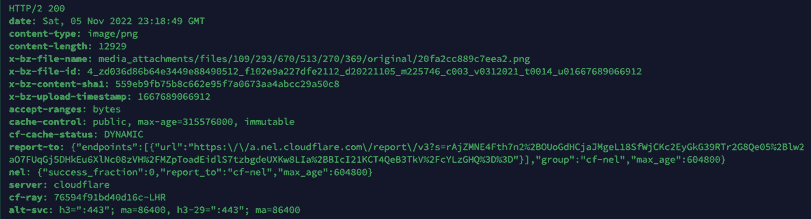
The command we'll be using is curl --head URL. The --head bit requests only the headers, and not the whole file. I've removed some of the unrelated headers for the sake of brevity, and changed the (very) long filename to save some space.
masto@mastodon:~$ curl --head https://massets.testbits.net/test.png
HTTP/2 200
date: Sat, 05 Nov 2022 23:18:49 GMT
content-type: image/png
content-length: 12929
x-bz-file-name: media_attachments/files/109/293/670/513/270/369/original/20fa2cc889c7eea2.png
x-bz-file-id: 4_zd036d86b64e3449e88490512_f102e9a227dfe2112_d20221105_m225746_c003_v0312021_t0014_u01667689066912
x-bz-content-sha1: 559eb9fb75b8c662e95f7a0673aa4abcc29a50c8
x-bz-upload-timestamp: 1667689066912
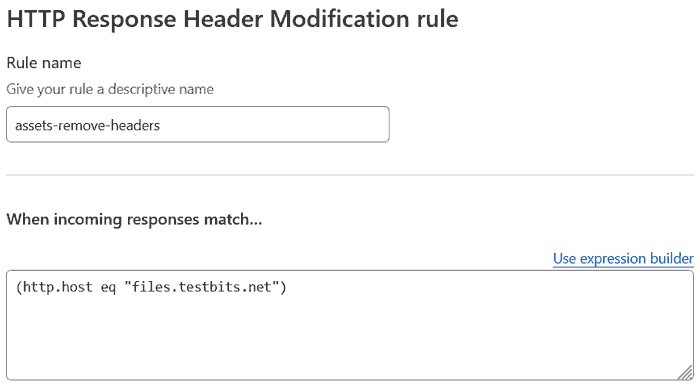
...To remove the 'x-bz' lines, go back into the Transform rules for your domain, click 'Create tranform rule' then 'Modify Response Header'.
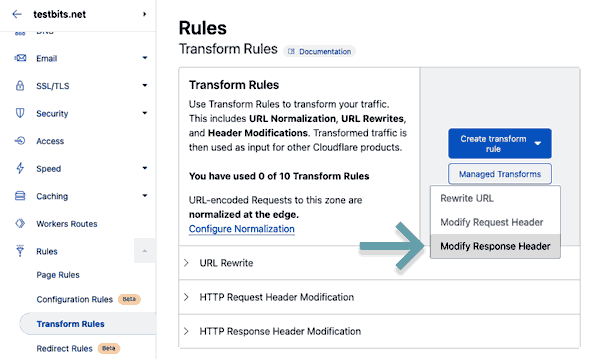
Give it a name, and then once again, choose 'Edit expression'
This expression is quite simple: (http.host eq "sub.example.com"). What this does is tell the rules engine to modify the headers for every file hosted on this subdomain.
Under 'Then...', you'll need to add a line for each 'x-bz' field you got back from your cURL request. For me, that's 5x 'Set new header', choose 'remove' and then enter the field:
- x-bz-file-name
- x-bz-file-id
- x-bz-content-sha1
- x-bz-upload-timestamp
- x-bz-info-src_last_modified_millis*
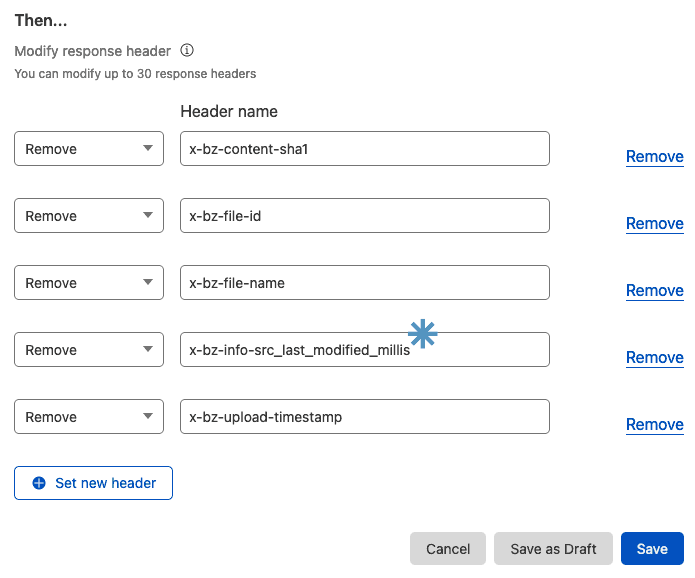
x-bz-info-src_last_modified_millis was present, but for files uploaded by Mastodon, it wasn't. If I had to guess, I'd say this is because Mastodon marks the uploaded files as immutable, therefore a 'last modified time' doesn't make sense.If you're only using the bucket for Mastodon, you can leave this one off. Or add it, it won't hurt either way.
Now click save, and when you run you cURL request again, you shouldn't see any of these headers:
masto@mastodon:~$ curl --head https://massets.testbits.net/test.png
HTTP/2 200
date: Sat, 05 Nov 2022 23:20:45 GMT
content-type: image/png
content-length: 12929
accept-ranges: bytes
...
Set an Entity Tag
An Entity Tag (or ETag) is like a version number for a file that allows expired cache items to be served by comparing the ETags of the file on the server, and from the expired cache file. If the two match, the old file can be considered current, and the browser will serve it.
The server compares the client's ETag (sent with If-None-Match) with the ETag for its current version of the resource, and if both values match (that is, the resource has not changed), the server sends back a 304 Not Modified status, without a body, which tells the client that the cached version of the response is still good to use (fresh).
-- Mozilla
To set this, go back into your Header Response Modification rule, and add a new line after the 'x-bz' removal lines. Choose 'Set Dynamic' from the drop-down, and ETag for the header name.
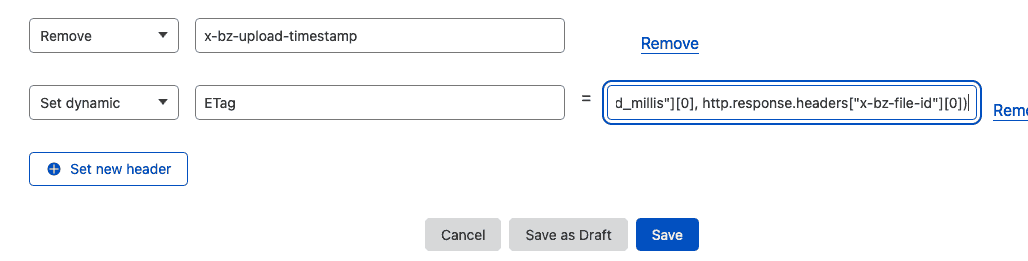
For the value box, we're going to follow the same idea that the Cloudflare blog post explains, and concatenate some of the Backblaze headers into a long identifier. You can copy and paste without changing anything:
concat(http.response.headers["x-bz-content-sha1"][0],
http.response.headers["x-bz-upload-timestamp"][0],
http.response.headers["x-bz-file-id"][0])Hit save, and make another cURL request and you'll see that the etag has appeared:
masto@mastodon:~$ curl --head https://massets.testbits.net/test.png
HTTP/2 200
date: Sat, 05 Nov 2022 23:25:18 GMT
content-type: image/png
content-length: 12929
accept-ranges: bytes
...
etag: eab00b741402b96c980c8d90d844431e4da047e416676947578554_zd036d86b64e3449e88490512_f110cb9bc36a9bb19_d20221106_m003237_c003_v0312008_t0019_u01667694757855
Override Cache Max-Age
The cache-control header tells the web browser how long it can cache and serve a file for before it needs to re-check the server for a newer version. Whether you need to do this or not will depend on the information you see in your cURL response.
Look for cache-control: and if it's there, the value 'max-age' is set to.
In my case, for the file I uploaded as a manual test, there's no cache control at all, but for files that Mastodon has uploaded, cache-control is present, and 'max-age=315576000', which is 10 years.
For the latter case, this is because Mastodon sets the cache length for files when it uploads them to B2, so if you're using Mastodon, perhaps you don't need to override this.
If you don't have a value, or do want to override it, back in Transform Rules, choose 'Create tranform rule' then 'Modify Reponse Header'. Name this new rule, and again, choose 'Edit expression' and enter (http.host eq "sub.example.com") in the box (again, this matches all traffic on the particular sub-domain).
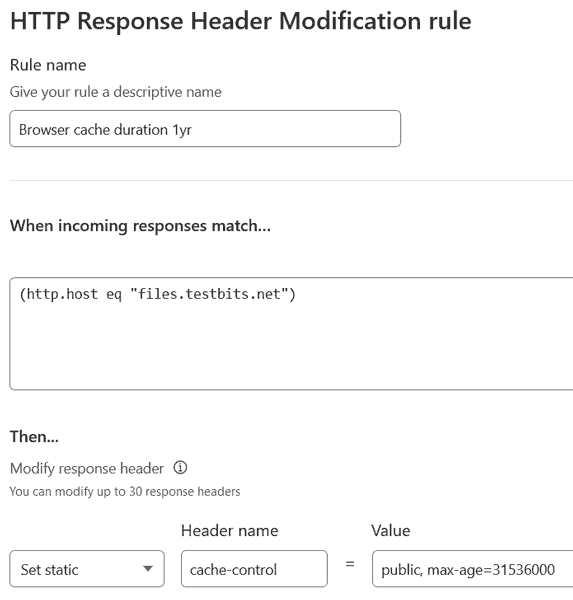
Choose 'Set static' from the drop-down, set the header name as cache-control and set the Value to your desired value.
Backblaze's blog gives the example of replacing an existing cache value with a new value. Worth bearing in mind that you can target parameters like this.
The value can simply be max-age= and a value, and unless you have any other values in there already (like the 'public' and 'immutable' I have above), I wouldn't recommend adding anything else unless you know why you want to add it. For my example case though, I would set the value as public, max-age=315576000, immutable.
Testing the cURL response now, you should see your equivalent of:
cache-control: public, max-age=315576000, immutableCORS
Cross-origin Resource Sharing allows web browsers to access resources for a page from origins other than the main web server. A different origin could be another domain, or even a different port on the server.
The Wikipedia page first line is the best explaination of this that I could find:
Cross-origin resource sharing (CORS) is a mechanism that allows restricted resources on a web page to be requested from another domain outside the domain from which the first resource was served.
You wouldn't allow this normally on your web server (because you don't want your content to be served elsewhere), but in this case we allow it from our bucket so the images are served correctly for our site/app/Mastodon instance.
In regards to Mastodon, the docs specifically state this is required:
You must serve the files with CORS headers, otherwise some functions of Mastodon's web UI will not work. For example, Access-Control-Allow-Origin: *
Depending on how you're going to use your bucket, you have the option to set a CORS header for specific filetypes, or for all requests. For a single purpose use-case, setting a header for all files makes sense, but if you're using a bucket for mixed images, CSS files, JS files, you might want to decide this on a case-by-case basis.
Set CORS for all files
If you want to set the header for all files, we can create a new 'Modify Reponse Header' rule or optionally tack this onto an existing rule we've created. The pros of doing this:
- Cloudflare free accounts allow for a limited number of rules so combining multiple 'all files' rules saves using an extra rule.
But the con:
- It's more difficult to know what your rule does, and if you switch it off, you'll be affecting completely disparate settings.
If you do edit an existing rule, choose one where the 'When incoming responses match…' expression was set to (http.host eq "sub.example.com").
If not, create a new rule, name it, click 'Edit expression' and enter (http.host eq "sub.example.com") in the box.
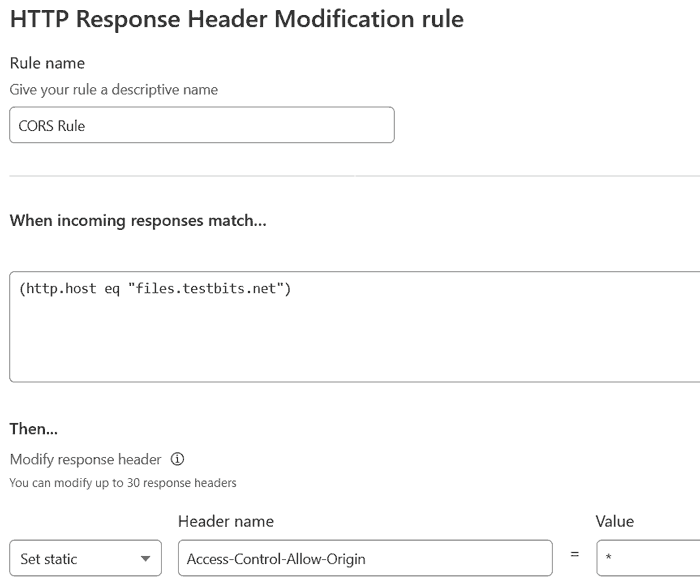
Now set a header: choose 'Set static', set the header name to 'Access-Control-Allow-Origin' and set the value to '*'. Save the rule.
Set CORS for specific files
If you want to set this header for just specific files, you can of course do that. Setting it for matching filetypes is a logical approach, and so when you create a new 'Modify Reponse Header' rule, you can use the drop-downs to set the field as 'URI Path', the operator to 'ends with' and the value to the filetype extension you want to match, e.g. '.jpeg'.
Note: to match the sub-domain (to prevent setting CORS across other sub-domains, use the expression below).
If you're setting a lot of filetypes, you can switch to the expression editor and use the format:
((http.host eq "sub.example.com") and (
(ends_with(http.request.uri.path, ".png")) or
(ends_with(http.request.uri.path, ".jpg")) or
(ends_with(http.request.uri.path, ".jpeg")) or
(ends_with(http.request.uri.path, ".gif")) or
(ends_with(http.request.uri.path, ".css")) or
(ends_with(http.request.uri.path, ".js"))
))
For the header we set, choose 'Set static', set the header name to 'Access-Control-Allow-Origin', and set the value to '*'.

Test CORS header
For the last time, run your cURL request, and see if we get the CORS header we expect:
masto@mastodon:~$ curl --head https://massets.testbits.net/test.png
HTTP/2 200
date: Sat, 05 Nov 2022 23:37:28 GMT
content-type: image/png
...
access-control-allow-origin: *
...
Check Cloudflare CDN Caching
If there was an award for the 'most optional step', this part would get it, but if you made it this far, you mind find it useful/interesting anyway.
Why is it optional? Well, Cloudflare caching is enabled by default, so we don't need to do anything further, but this seems like the best place to explain how to check the Cloudflare caching status, and highlight how this can affect your Backblaze 'class B transactions' allowance/charge.
Cloudflare HIT or MISS
When you run a cURL request, one of the headers you'll recieve back is 'cf-cache-status'. The value will either be 'HIT' (which means you've accessed a cached file) or 'MISS' (it had to be retrieved from the origin server).
If it was a HIT, you'll also see an 'age' header and a value in seconds. If the age is less than the 'cache-control: max-age' value, it will remain in the cache.
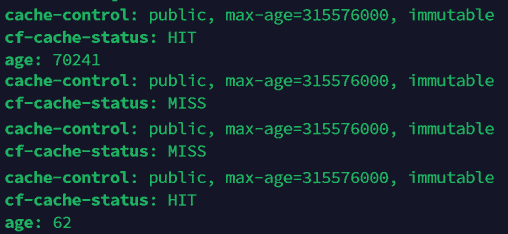
If you run the same cURL request multiple times, you might expect to see a MISS, followed by HITS. This would be the case if Cloudflare had one datacentre/server, but remember that Cloudflare is a CDN with vast global infrastructure. So what actually happens could be:
MISS, HIT, MISS, MISS, HIT, HIT...
Eventually, you'll see mainly HITS, as each server has its own cached version of the content. What does this mean? Well, each MISS caused another B2 class B transaction as that particular Cloudflare server retrieved the file. When you are seeing only HITS, your class B transaction counter will stop because Cloudflare is serving each request from its cache, even for visitors who have never loaded your website before. This is great, and we want the files in as many Cloudflare datacentres as possible, because this means that visitor will be served the content from their nearest Cloudflare datacentre. They might be the other side of the world from your web server, but if the images, videos, CSS, JS, etc. are loaded from the same city as them, the whole page loads much faster and makes for a significantly better user experience.
Final Thoughts
This post turned into a bit of a monster! I hope it helps you to setup your own Backblaze bucket behind Cloudflare to lower your costs and improve the experience for your users.
If you hadn't ever looked at Cloudflare, I hope it gives you a bit of information on the scale of services they provide, and the depth of features that even free accounts have.
There are bound to be some issues/errors/typos in this one, so please let me know in the comments if that's the case, or if I've overlooked anything you think should be added. You can also find me over at @techbitsio.